
Notion is a multi-featured app for organizing each form of content material materials supplies, from notes to calendars and reminders. In our remaining article, “Getting Began with the Notion API and Its JavaScript SDK”, we delved into discover ways to make use of Notion’s API and created a small interface to work together with it. This textual content material now will uncover one completely different use case for the Notion API: making a JavaScript quiz.
Whereas no earlier knowledge is required to observe together with this textual content material (I’ll present all of the required steps), we’ll be coping with front-end and back-end code, as there’s barely little little bit of Node.js and Categorical setup concerned, so some JavaScript expertise are assumed.
Key Takeaways
- Revenue from the Notion API to creatively adapt a Desk database for making a JavaScript quiz, irrespective of Notion not being inherently designed for quiz databases.
- Implement a JavaScript and Node.js setting, incorporating Categorical and dotenv for server administration and setting variable safety.
- Securely combine with Notion by producing and utilizing an Inside Integration Token, ensuring API interactions are authenticated.
- Retrieve quiz knowledge from Notion utilizing a structured question that maps database entries to a usable format contained in the JavaScript software program program.
- Improve shopper interplay by dynamically rendering quiz questions and choices contained in the browser, and dealing with shopper responses with seen choices.
- Leverage the flexibleness of the Notion API to customise and automate the quiz setup, making it a scalable reply for fairly a couple of capabilities.
JavaScript Quiz Mission Setup
We’re going to separate our setup into two sections. All through the primary one, we’ll stroll via the required setup on the Notion aspect, and one the second half we’ll work with our code.
To take a look at alongside, you’ll want a Notion account (additional on that beneath), together with a contemporary copy of Node put in in your machine. As ever, the remaining code for the tutorial is more likely to be discovered on GitHub.
The Notion Setup
In case you don’t have already got a Notion account, please create one by following this hyperlink. After creating your account and logging in, create a mannequin new web net web page by deciding on Add a web based net web page and offers it a fame. For this tutorial, we’ll use a Desk database. Though it’s not the correct database to assemble a quiz, it’s the closest we’ll purchase with Notion!
Inserting data into the desk
Now that we now have our empty Desk, we have to work out discover ways to precisely insert our data into it.
Our meant schema for our quiz is the following:
{
"1": {
"Query": "Which is the aim of JavaScript?",
"Choices": {
"1": "To type HTML Pages",
"2": "So as in order so as to add interactivity to HTML pages",
"3": "To carry out server aspect scripting operations"
},
"Acceptable": "So as in order so as to add interactivy to HTML pages"
},
"2": {
"Query": "To insert a JavaScript into an HTML web net web page, which tag is used?",
"Choices": {
"1": ",
"2": "" ,
"3": "
},
"Acceptable": "
},
"3": {
"Query": "Which of the following is suitable to jot down “Hey there World” on the internet web net web page?",
"Choices": {
"1": "print('Hey there World')",
"2": "doc.write('Hey there World')",
"3": "response.write('Hey there World')"
},
"Acceptable": "doc.write('Hey there World')"
}
}
Notion isn’t really constructed for such a database, so we have to get inventive with it! 💡 So our Query column will most likely be solely a Title (which works good) and our Acceptable column will most likely be of variety Textual content material materials (which furthermore works as meant). For our quite a few selections, although, we have to do one issue utterly utterly completely different! My approach to it’s to make the most of the Multi-select subject variety so I can write quite a few outcomes into the same cell (we’ll see down the trail what the knowledge retrieved from this looks as if). So our Desk should seem like the following picture as a result of the tip end consequence.

Creating our Notion API integration
Now we have to go to the Notion API website to create our integration. Press the My Integrations button on the perfect appropriate nook after which click on on on on Create new integration. Now we have now to fill in our title and make sure you select our Related workspace (will most likely be chosen by default nonetheless make sure that of this). If we press Submit, we’ll be directed to a mannequin new web net web page with an Inside Integration Token (we’ll use this in our code) and with two choice containers for the place we have now to make use of our integration. We don’t should do one factor on this web net web page except for copy our token and press Save adjustments.
Now we return to our Notion workspace. In our newly created Notion database, we have now to press Share, then Invite. We’ll then have the facility to pick our newly created integration. If we select it and press Invite, our Notion setup is accomplished. Correctly carried out! 🙌
The Code Setup
For our code setup, we’ll use a Notion template repository (which we’ll then use on any of our Notion API duties!) that already has the preliminary code required to work with Notion’s API. This repo is more likely to be discovered correct proper right here, so make sure you fork it and clone it to accompany our mission! In case you’re taken with what all of the bits of code do, please speak about with “Getting Began with the Notion API and Its JavaScript SDK”, since we go into fairly a couple of element for each little little little bit of code (the repo furthermore has a README that should clarify what it does!).
Putting in dependencies
After forking and cloning our Notion template repo, our first step is to put in our dependencies, so make sure that to run yarn or npm organize on our terminal contained throughout the folder. On this mission we now have three dependencies: the @notionhq/shopper, dotenv and Categorical. We’ll use dotenv to take care of our variables and protect them protected (such because of the one we noticed on our integration) and Categorical to create our as soon as extra finish and server for our software program program.
To take care of our variables with dotenv, create a .env file on the muse of our mission and paste the following there:
NOTION_API_KEY = YOUR_TOKEN_HERE
NOTION_API_DATABASE = YOUR_DATABASE_ID_HERE
Our NOTION_API_KEY is the important issue that we’re going to uncover in our Integrations, and our NOTION_API_DATABASE is more likely to be discovered by going to the created Notion web net web page and looking out on the browser’s URL bar. It comes after your workspace title (if we now have one) and the slash (myworkspace/) and before the query mark (?). The ID is 32 characters extended, containing numbers and letters:
https://www.notion.so/myworkspace/a8aec43384f447ed84390e8e42c2e089?v=...
                                  |--------- Database ID --------|
If we’re fearful about having Notion’s API keys on a file inside our repo, uncover that on our .gitignore we now have the .env file there; the .gitignore permits us to place utterly utterly completely different file/folder names inside, and that signifies that these recordsdata/folders obtained’t be added to our repo as quickly as we push our code.
Now that we now have our preliminary repository and we now have the required credentials from Notion, we’ll begin engaged on our quiz!
Grabbing the JavaScript Quiz Knowledge
We should always on a regular basis first affirm if we’re successfully related to our Notion database, so we’ll navigate to our .index.js file and log our reponse variable (see how we’re grabbing our databaseId from our .env file and utilizing it on our database question?).
If we then run yarn begin, we must always on a regular basis see one issue like the following screenshot on our terminal.
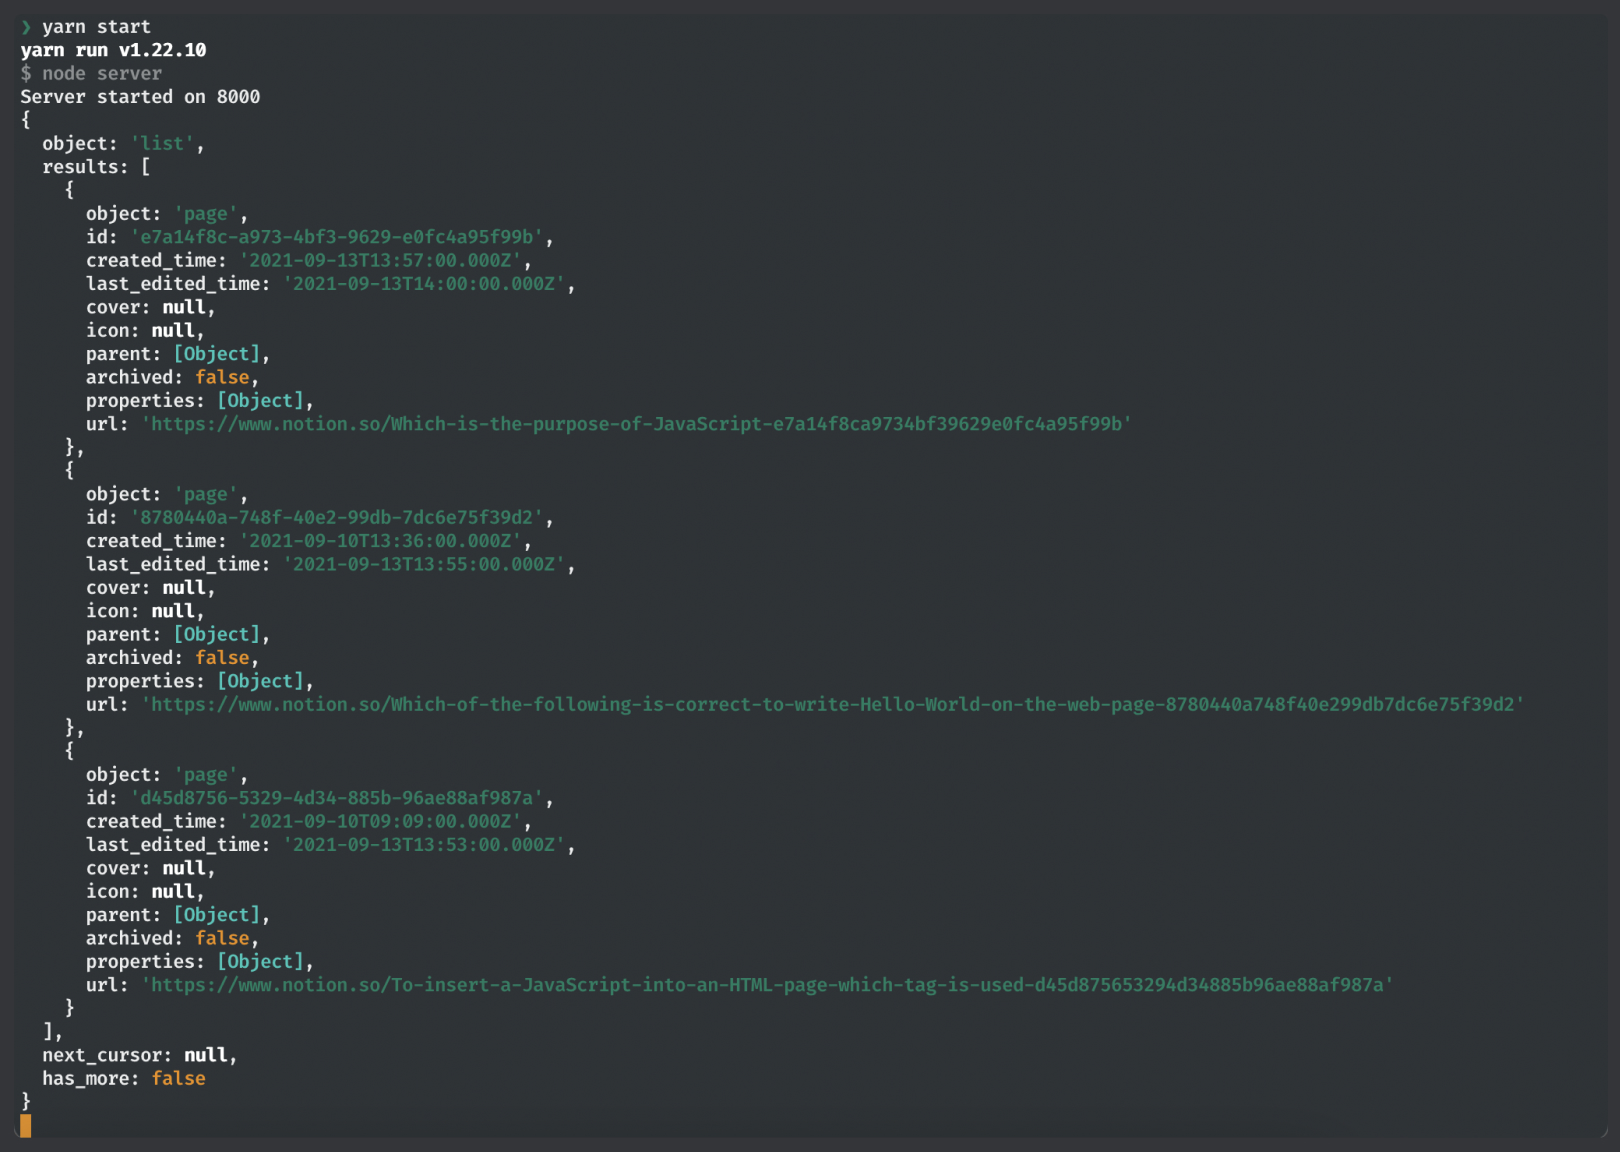
Seeing this on our terminal signifies that we’re precisely related to our Notion database and that we’re going to now get our required knowledge. Our getDatabase perform will seem like this:
exports.getDatabase = async perform () {
  const response = await notion.databases.question({ database_id: databaseId });

  const responseResults = response.outcomes.map((web net web page) => {
    return {
      id: web net web page.id,
      query: web net web page.properties.Query.title[0].plain_text,
      choices: web net web page.properties.Choices.multi_select,
      acceptable: web net web page.properties.Acceptable.rich_text[0].plain_text,
    };
  });

  return responseResults;
};
With responseResults, we’re mapping over our outcomes (matching the entries in our database) and we’re mapping the paths for quite a few properties to names that we’re deciding on (on this case, id, query, choices and acceptable). Uncover how specific the merchandise path is. That is by design, which signifies that, when rising and coping along with your non-public database, it’s best to repeatedly have a look at the returned properties till you uncover the knowledge you’re in search of (it’s really a matter of trial and error).
With this new code, we’re almost making a fame to our API and deciding on the properties that we have now to make use of in our code, which signifies that we’re able to work with them on our interface!
Displaying Our Knowledge contained in the Browser
Let’s begin by coping with our HTML and CSS, since they’re fairly direct! We obtained’t do any adjustments on our HTML from the template, and on our type.css we’ll paste the following code beneath the present one:
.questionContainer {
  padding: 30px;

  current: flex;
  flex-direction: column;
  justify-content: coronary coronary heart;
  align-items: coronary coronary heart;

  box-shadow: rgba(149, 157, 165, 0.2) 0px 8px 24px;
  border-radius: 10px;
}

.numberElement {
  margin: 0px auto 10px;

  font-size: 12px;
  font-weight: 700;
  text-transform: uppercase;
}

.query {
  margin: 0px auto 40px;
}

.answersDiv {
  width: 100%;

  current: flex;
  flex-direction: column;
  hole: 20px;
}

.answerOption {
  padding: 20px;
  margin: 0px;

  font-size: 18px;
  text-align: coronary coronary heart;

  cursor: pointer;

  border: 1px safe rgb(42, 43, 44);
  border-radius: 40px;
}
We obtained’t see these styling adjustments nevertheless, nonetheless we’ll now give consideration to the effectivity, which is the extra necessary a part of this tutorial.
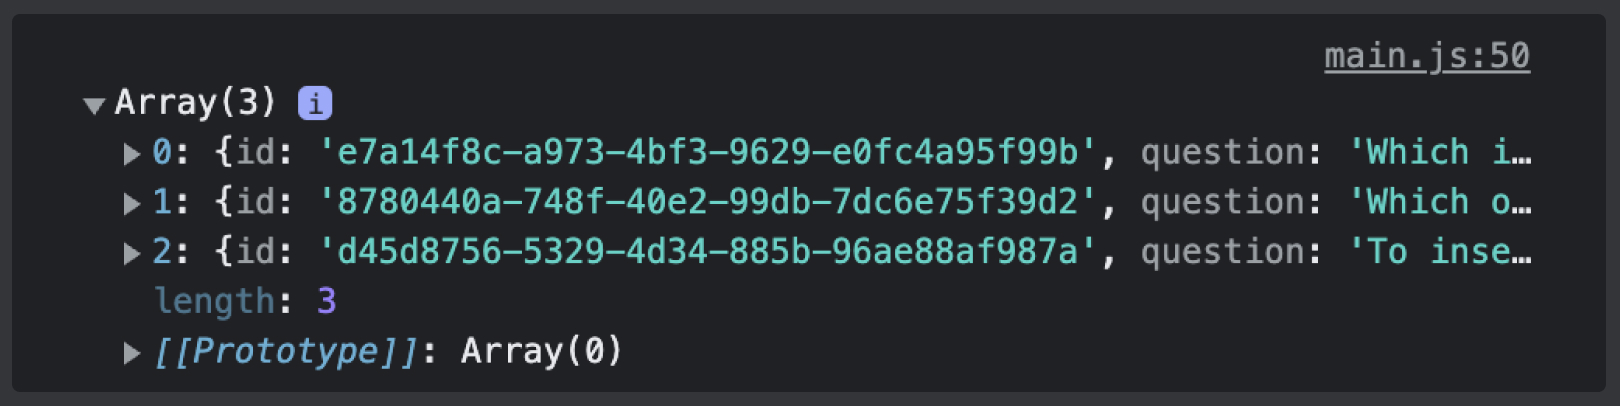
If we now go to the primary.js file contained throughout the public folder, we’ll see that we’re already grabbing our knowledge from our as soon as extra finish with the getDataFromBackend perform. In case you’re confused by this, “Getting Began with the Notion API and Its JavaScript SDK” has a lengthier rationalization for it, nonetheless totally on our server.js we created a route that may get our database, and correct proper right here on getDataFromBackend we’re making a fetch to that very same route, which could seize our knowledge for us.
Uncover how inside addData we have already got const knowledge = await getDataFromBackend();. As a result of this we’re prepared to start out working with our knowledge, and we’ll really affirm this! log this knowledge variable and we must always on a regular basis see, on our console, an array of our database entries.
Displaying our knowledge on the present show display
Now that everybody is aware of what our returned knowledge looks as if, we have to consider how we really need to present it on the present show display. My concept for it’s to have a card for every query, with the utterly utterly completely different choices inside, and when the client presses the appropriate reply, the reply’s background should flip inexperienced; if it’s fallacious, it should flip pink.
Let’s begin by making a
forEach loop, permitting us to create the
and add some applications to it.
So inside our addData perform we'll do that:
const addData = async () => {
const knowledge = await getDataFromBackend();
knowledge.forEach((value, index) => {
const div = doc.createElement('div');
div.classList.add('questionContainer');
container.append(div);
});
};
But it surely certainly completely nonetheless feels a bit empty, so let’s append a header for every card like this:
const addData = async () => {
const knowledge = await getDataFromBackend();
knowledge.forEach((value, index) => {
const div = doc.createElement('div');
div.classList.add('questionContainer');
const numberElement = doc.createElement('p');
numberElement.classList.add('numberElement');
numberElement.innerHTML = `Query ${index + 1}`;
div.appendChild(numberElement);
container.append(div);
});
};
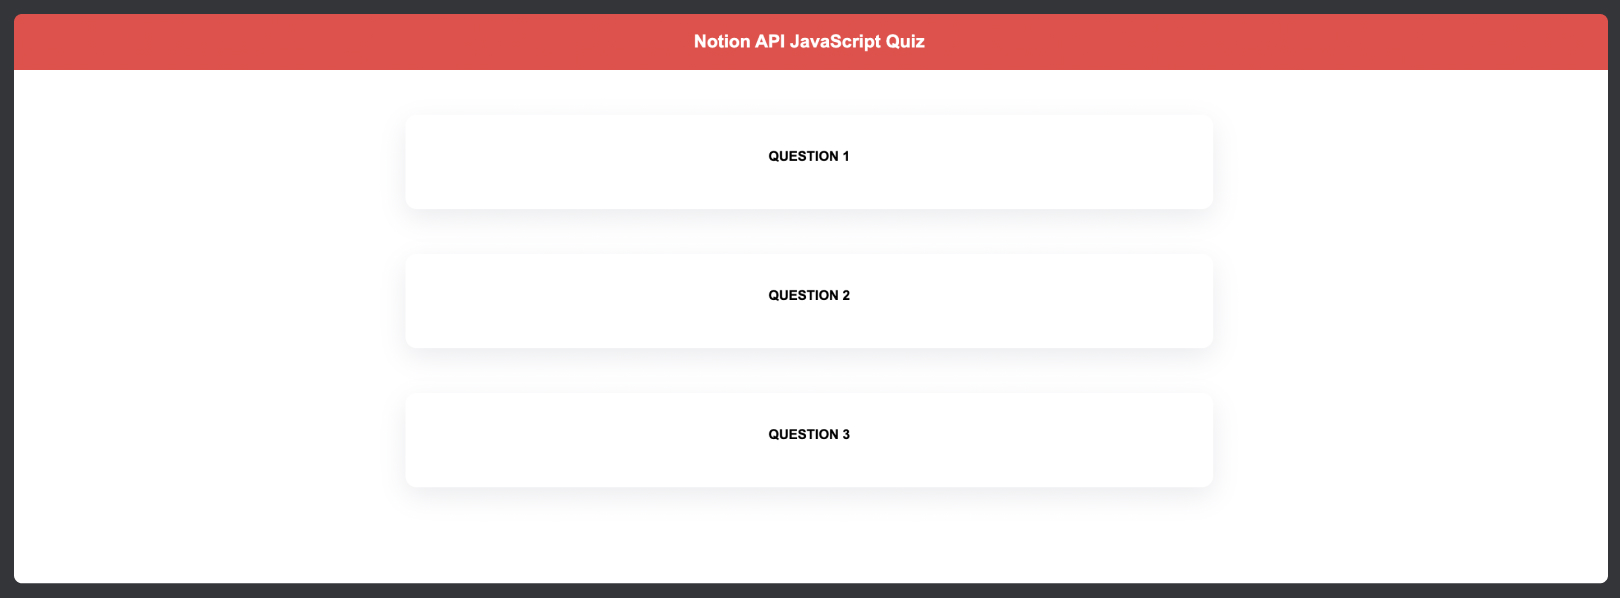
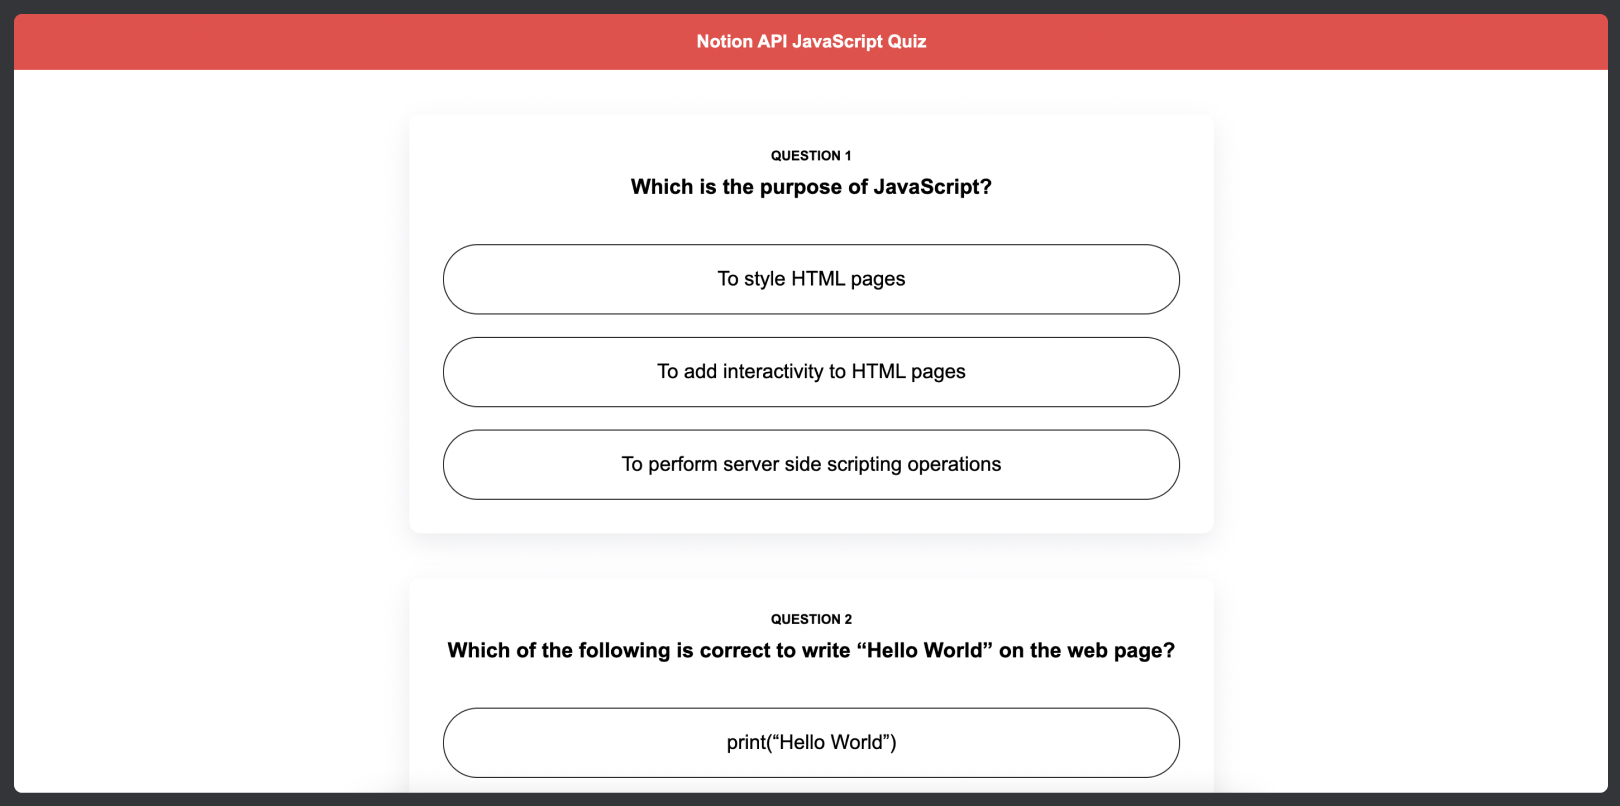
Correct proper right here we’re making a index + 1, on account of arrays in JavaScript are zero-based and we don’t need to see Query 0, since that doesn’t make sense! If we now begin our app, we must always on a regular basis see one issue like what’s pictured beneath.
The satisfying half: new capabilities for rendering questions and choices
Now for the satisfying half! We'd do all of our logic inside addData, nonetheless that can get too messy, so we’re going to create new capabilities to render our query and choices.
Let’s begin with the query, and let’s do some work on our addData perform that obtained’t nonetheless translate into fairly a bit:
const addData = async () => {
const knowledge = await getDataFromBackend();
knowledge.forEach((value, index) => {
const div = doc.createElement('div');
div.classList.add('questionContainer');
const numberElement = doc.createElement('p');
numberElement.classList.add('numberElement');
numberElement.innerHTML = `Query ${index + 1}`;
div.appendChild(numberElement);
const query = createQuestion(value.query);
div.appendChild(query);
container.append(div);
});
};
The code we merely added is very like that for the numberElement, nonetheless correct proper right here we’re assigning a perform to a variable and appending that variable. Uncover furthermore that we’re passing value.query into our createQuestion, on account of we have now to work with and render the query, in any case. It might all make sense in a short while — don’t fear!
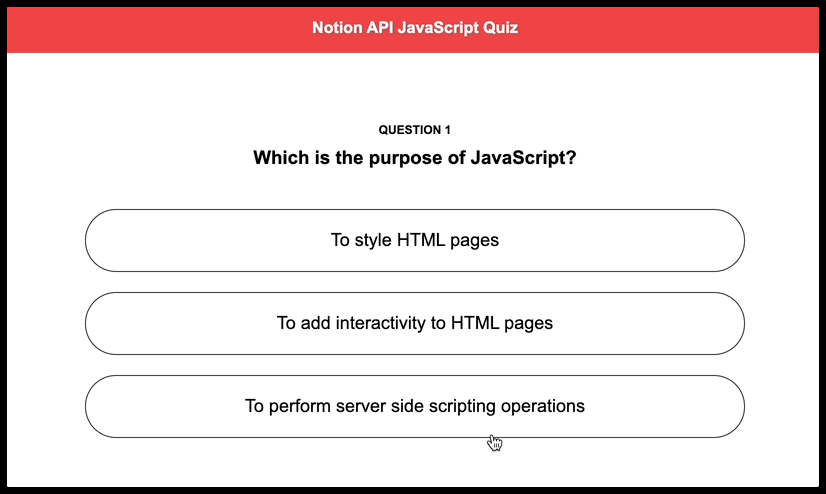
Now, outside and above addData, let’s create this new createQuestion perform. Inside it, we almost need the same logic that we added for our numberElement: create an element, give it a category, and add some content material materials supplies to it. Correct proper right here we’ll be utilizing not innerHTML nonetheless createTextNode: since our questions are associated to code, if we have been to make the most of innerHTML in a single issue like textual content material materials, it's going to really render the phrase textual content material materials nonetheless with daring as a substitute of the whole syntax (you may see an event correct proper right here). Our remaining createQuestion will seem like this:
const createQuestion = (query) => {
const questionElement = doc.createElement('h3');
questionElement.classList.add('query');
const questionNode = doc.createTextNode(query);
questionElement.appendChild(questionNode);
return questionElement;
};
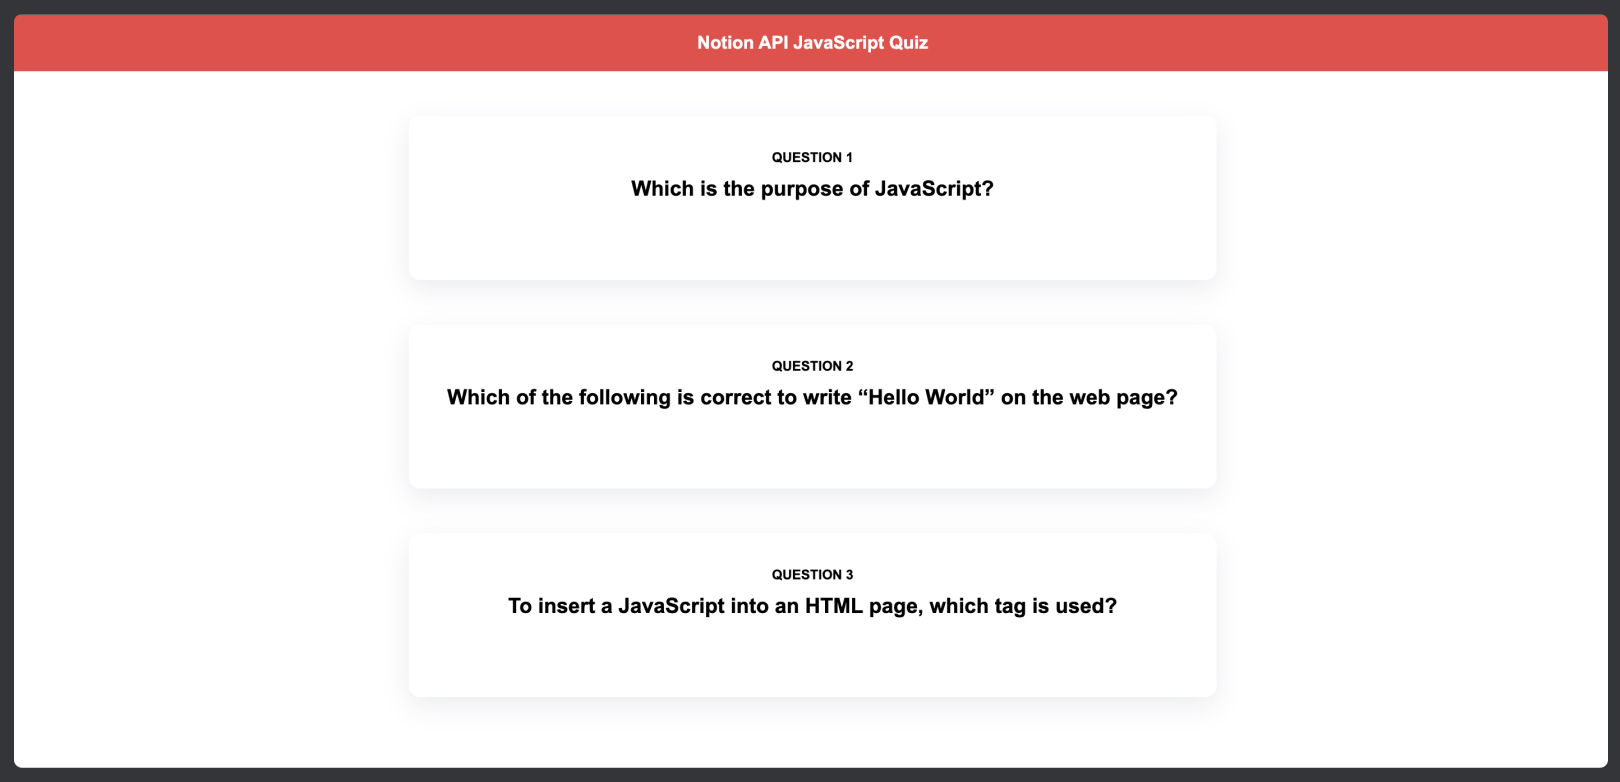
If we now run yarn begin, our browser ought to look as confirmed beneath.
Now our setup for our choices is solely regarding the comparable. Let’s first do the same difficulty that we did with createQuestion inside addData:
const addData = async () => {
const knowledge = await getDataFromBackend();
knowledge.forEach((value, index) => {
const div = doc.createElement('div');
div.classList.add('questionContainer');
const numberElement = doc.createElement('p');
numberElement.classList.add('numberElement');
numberElement.innerHTML = `Query ${index + 1}`;
div.appendChild(numberElement);
const query = createQuestion(value.query);
div.appendChild(query);
const choices = createAnswers(value);
div.appendChild(choices);
container.append(div);
});
};
And now our preliminary look for createAnswers will seem like this:
const createAnswers = (value) => {
const answersDiv = doc.createElement('div');
answersDiv.classList.add('answersDiv');
return answersDiv;
};
Uncover how we’re doing const choices = createAnswers(value);. We'll’t merely cross value.choices to our perform, on account of we furthermore want the value.acceptable. We'd as a substitute of this cross two arguments to our perform: one for the array of choices and the opposite one could be the acceptable one.
Rendering an array of choices
We now have an array of choices, and we have to render all of them, so we wish a loop to endure all of them. The tactic inside this loop will almost be the same as for all the opposite components, so we should be professionals at this diploma at rendering components on the DOM:
const createAnswers = (value) => {
const answersDiv = doc.createElement('div');
answersDiv.classList.add('answersDiv');
for (let i = 0; i value.choices.measurement; i++) {
const answerElement = doc.createElement('p');
answerElement.classList.add('answerOption');
const answerNode = doc.createTextNode(value.choices[i].title);
answerElement.appendChild(answerNode);
answersDiv.appendChild(answerElement);
}
return answersDiv;
};
With this code, we’re looping over our array, making an element, giving it a category and utilizing createTextNode to render our choices. (Funnily sufficient, if we had used innerHTML correct proper right here, the choices with answerNode to our
! If we run yarn begin, we’ll now see our full quiz! Woo! 🚀
Interacting with the Choices
Hmm… Nonetheless we'll’t really work together with the choices, and it’s unlikely a quiz if we don’t get to know if we obtained the reply appropriate or fallacious, appropriate? We should always on a regular basis restore that!
Everybody is aware of that we have now to click on on on on every reply and know if it’s appropriate or fallacious, so we'll begin by along with an occasion listener to it like so:
const createAnswers = (value) => {
const answersDiv = doc.createElement('div');
answersDiv.classList.add('answersDiv');
for (let i = 0; i value.choices.measurement; i++) {
const answerElement = doc.createElement('p');
answerElement.classList.add('answerOption');
const answerNode = doc.createTextNode(value.choices[i].title);
answerElement.addEventListener('click on on on', () => {});
answerElement.appendChild(answerNode);
answersDiv.appendChild(answerElement);
}
return answersDiv;
};
Do not forget that we did createAnswers(value), so we'd get the value.acceptable? Now it’s its time to shine! After we click on on on on a solution, there are two attainable outcomes: the client chooses the reply that’s equal to the becoming reply, or the client chooses a solution that’s not equal to the becoming reply. To take care of these attainable outcomes, we’re going to make the most of an if assertion, and top-of-the-line methods we’re going to level to our shoppers that they obtained a solution appropriate or fallacious is thru a change of the background-color of the reply. So our logic will seem like this:
const createAnswers = (value) => {
const answersDiv = doc.createElement('div');
answersDiv.classList.add('answersDiv');
for (let i = 0; i value.choices.measurement; i++) {
const answerElement = doc.createElement('p');
answerElement.classList.add('answerOption');
const answerNode = doc.createTextNode(value.choices[i].title);
answerElement.addEventListener('click on on on', () => {
answerElement.type.shade = 'white';
if (value.choices[i].title !== value.acceptable) {
answerElement.type.backgroundColor = '#f55142';
} else {
answerElement.type.backgroundColor = '#6dbf39';
}
});
answerElement.appendChild(answerNode);
answersDiv.appendChild(answerElement);
}
return answersDiv;
};
So with every click on on on, we’re altering the textual content material materials shade to white, after which we’re checking if the title property of every reply is equivalent as value.acceptable (that is clearly not absolute best, and an index could also be considerably fairly a bit bigger, nonetheless we did our greatest with Notion’s databases!). If it’s not, we modify its shade to pink and whether or not or not it is, we modify it to inexperienced!
And that’s our quiz carried out! 🚀 Isn’t it unbelievable?
Notion JavaScript Quiz Wrapup
On this tutorial, we’ve explored fairly a couple of functionalities offered by Notion’s API and, really, it’s frequently very thrilling to see how fairly a bit you'll do with such a easy instrument!
I hope this put up finally ends up inspiring you to search out the Notion API and to assemble your non-public quizzes and utterly completely different rad stuff with Notion!
Must you need to shortly try this Notion mission, you may clone it from our GitHub repo.
Steadily Requested Questions (FAQs) about Notion API and JavaScript Quiz
How can I exploit the Notion API to create a JavaScript Quiz?
The Notion API lets you work together with Notion’s database and create dynamic capabilities like a JavaScript Quiz. To do that, it's worthwhile to first create a Notion account and generate an API key. Then, you want to take advantage of this key to make requests to the Notion API and fetch knowledge out of your Notion workspace. It is doable you may then use this knowledge to create inquiries to your JavaScript Quiz. The API gives fairly a couple of flexibility, permitting you to customise the quiz consistent with your wishes.
What are some nice advantages of utilizing the Notion API for making a JavaScript Quiz?
The Notion API gives a number of benefits for making a JavaScript Quiz. Firstly, it lets you retailer and take care of your quiz knowledge in a structured and arranged methodology. Secondly, it gives fairly a couple of flexibility, permitting you to customise the quiz consistent with your wishes. Lastly, it lets you automate the tactic of making and updating the quiz, saving you fairly a couple of effort and time.
Can I exploit the Notion API to create quizzes in a number of programming languages?
Sure, you want to take advantage of the Notion API to create quizzes in a number of programming languages. The API is language-agnostic, which suggests it could possibly be used with any programming language that helps HTTP requests. This incorporates commonplace languages like Python, Java, and Ruby, amongst others.
How safe is the Notion API?
The Notion API makes use of safe HTTPS connections for all requests, ensuring that your knowledge is encrypted and safe. Moreover, it requires an API key for authentication, ensuring that solely accepted shoppers can entry your knowledge.
Can I exploit the Notion API to create differing sorts of capabilities?
Sure, the Notion API shouldn't be restricted to creating quizzes. That you will need to use it to create various capabilities, from mission administration gadgets to non-public note-taking apps. The API gives fairly a couple of flexibility, permitting you to customise your software program program consistent with your wishes.
How can I get began with the Notion API?
To get began with the Notion API, it's worthwhile to first create a Notion account and generate an API key. Then, you want to take advantage of this key to make requests to the Notion API and fetch knowledge out of your Notion workspace. Yow will uncover detailed documentation on discover ways to make use of the API on the Notion website.
What are the restrictions of the Notion API?
Whereas the Notion API gives fairly a couple of flexibility, it does have some limitations. For instance, it will not help real-time updates, which suggests it's worthwhile to manually refresh the knowledge. Moreover, it has cost limits to stop abuse, which could restrict the variety of requests you may make in a sure interval.
Can I exploit the Notion API for enterprise options?
Sure, you want to take advantage of the Notion API for enterprise options. Nonetheless, it's worthwhile to control to Notion’s phrases of service and assure that your use of the API wouldn't violate any licensed pointers or pointers.
How can I troubleshoot components with the Notion API?
In case you encounter components with the Notion API, you may speak about with the API documentation for troubleshooting ideas. Moreover, you may attain out to Notion’s help crew for help.
Can I combine the Notion API with utterly completely different APIs?
Sure, you may combine the Notion API with utterly completely different APIs to create additional troublesome capabilities. For instance, chances are you'll combine it with an area climate API to create a personalised native climate dashboard in your Notion workspace.
Hello there, I am Rui and I am from Portugal. I am a self-taught front-end developer with a Grasp's Diploma in Psychology. After ending my course I seen that I needed to go away my mark on the world and the dev world was the plain completely different because of it frequently fascinated me!
NotionNotion API