
Iconography is a misplaced artwork work. Illustration is tremendous time-consuming, and there’s an abundance of sources out there in the marketplace already. So it’s not frequently price reinventing the wheel. Nonetheless we would have a particular artwork work model, or the icon framework we’re utilizing could not have the icon we would like, so it’s price diving into how illustration works in Figma a bit bit. On this tutorial, we’ll uncover strategies to draw and manipulate vectors in Figma as we create a heart-shaped icon to accompany the button.
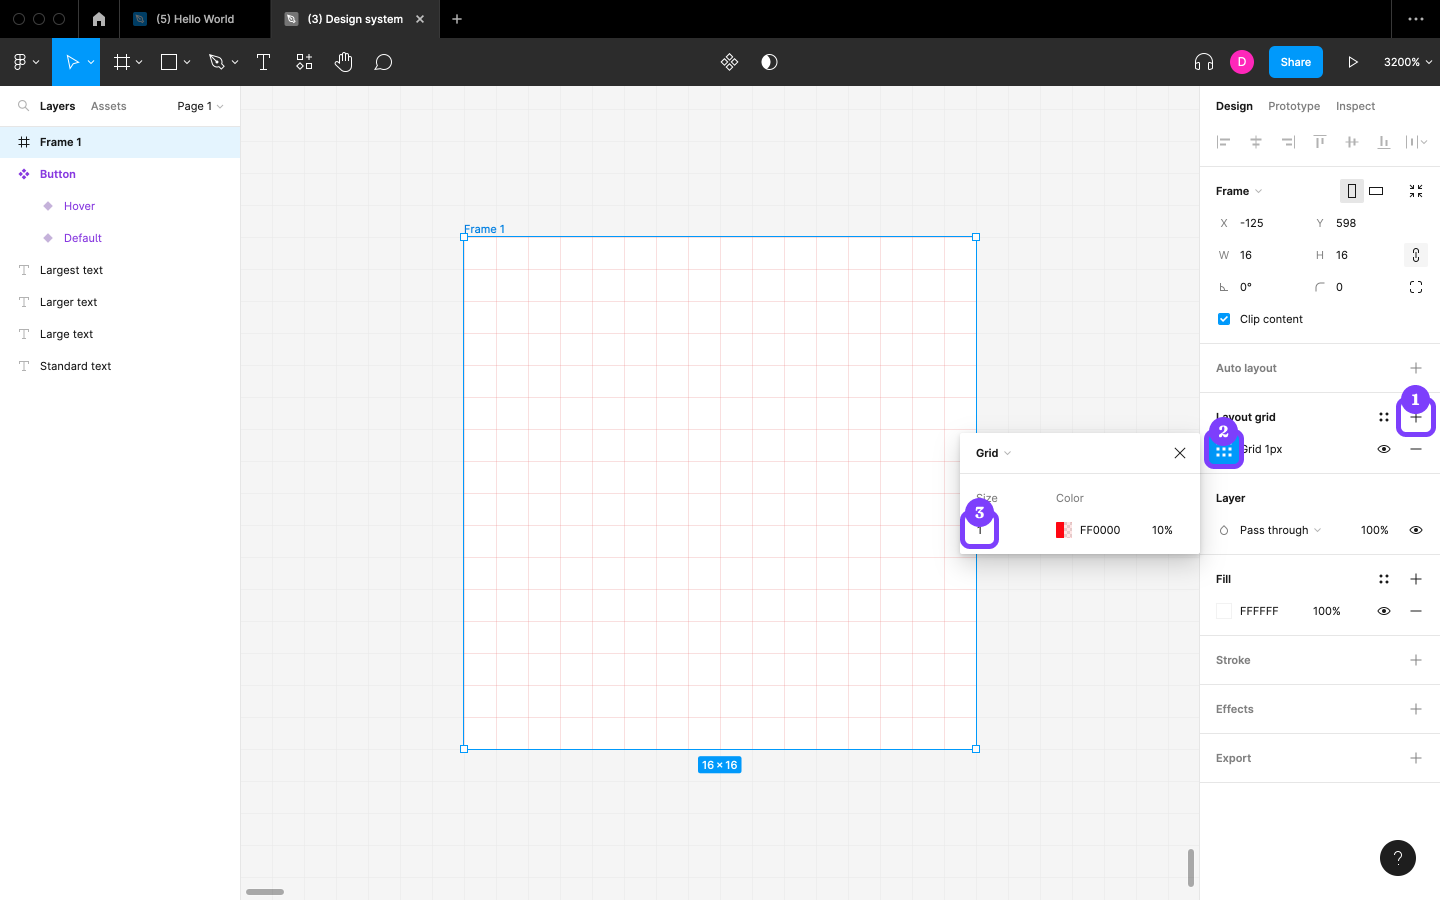
Begin by making a 16×16 Physique, which is likely to be the bounding topic for our icon. Paul Wilshaw explains why it’s most attention-grabbing to make the most of 16×16 in his write-up on icon design.

Subsequent, click on on on on the + icon subsequent to “Format grid” contained in the Design panel so as in order so as to add a Grid to the Physique, click on on on on the “Format grid settings” icon, after which change the “Measurement” to 1 to make the person sq. pixels clearer. To confirm the icon reveals clearly at most sizes and present show resolutions, the objective could also be to align the icon with the grid strains as masses as potential.
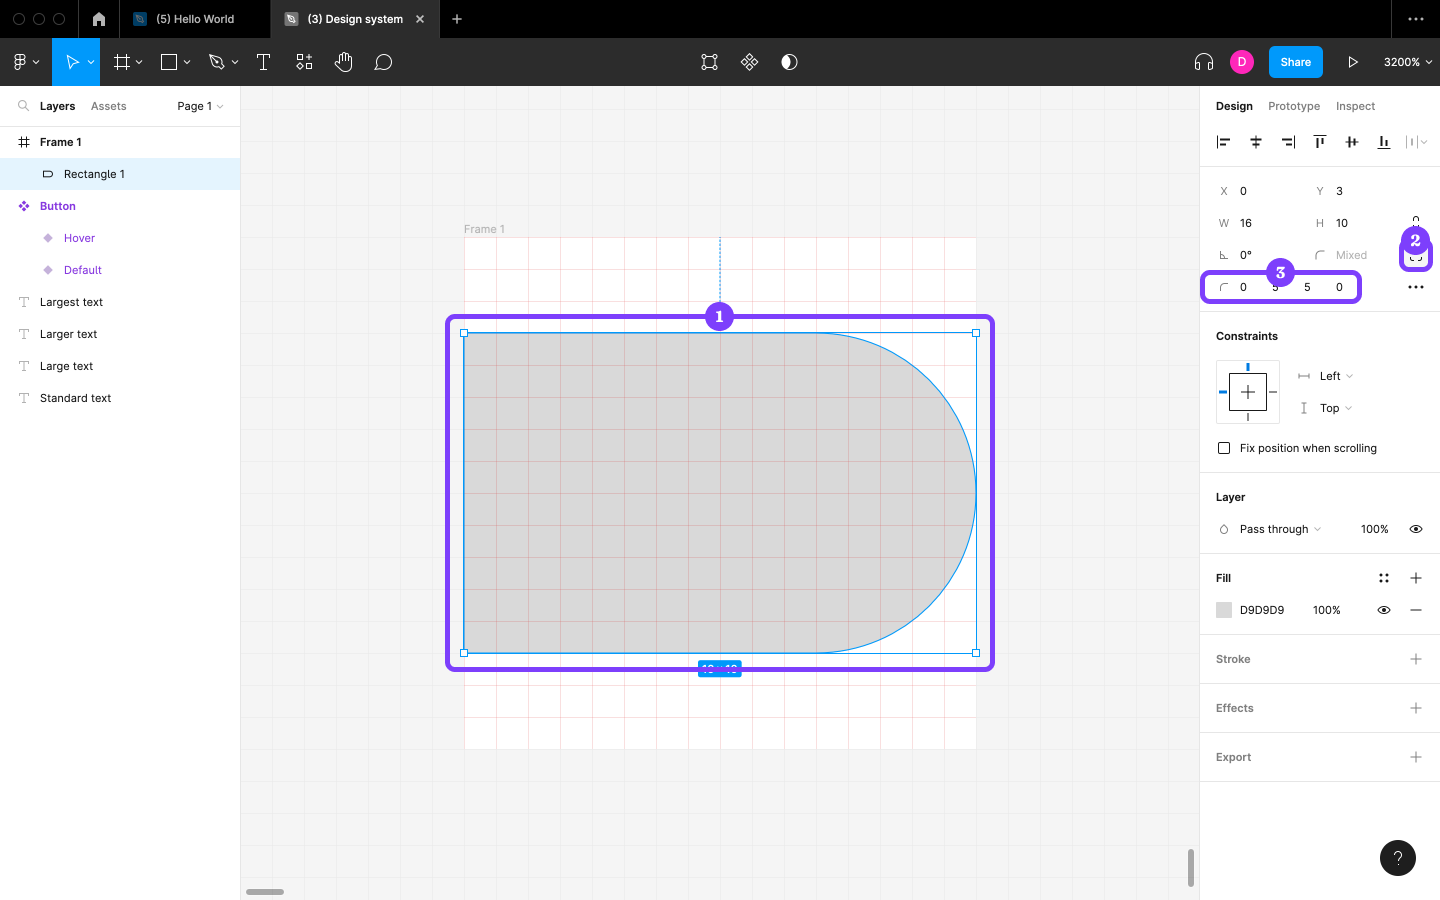
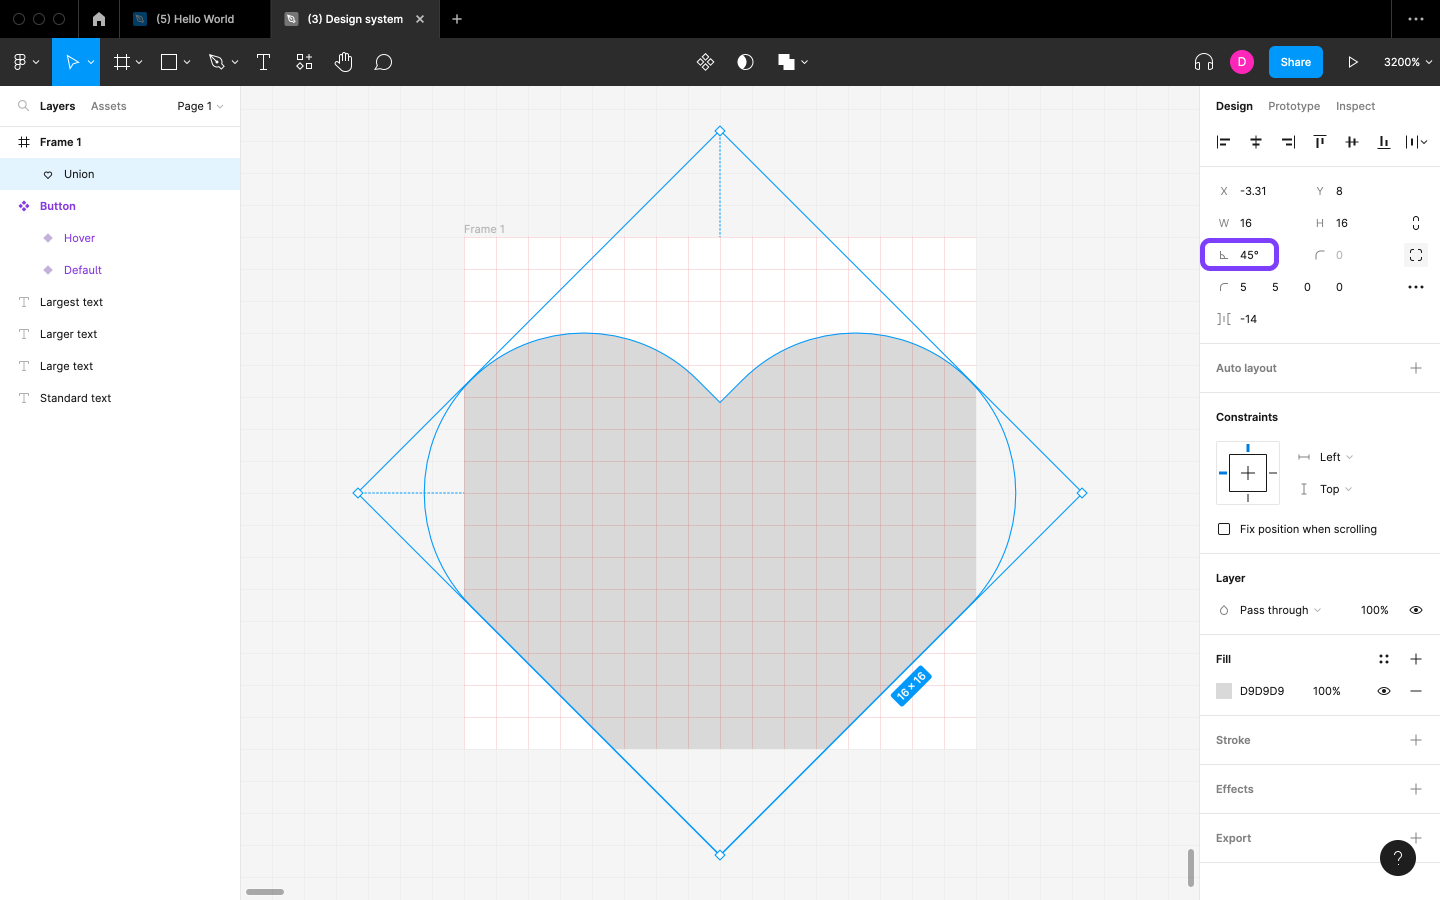
Now for the icon itself. Begin by making a Rectangle form and specifying the “W” as 16 and “H” as 10after which click on on on on the “Unbiased corners” icon earlier than specifying the nook radii as 0, 5, 5and 0 in that order (that’s, clockwise ranging from the top-left nook).
Subsequent, duplicate the Layer and alter the “Rotation” to 90.
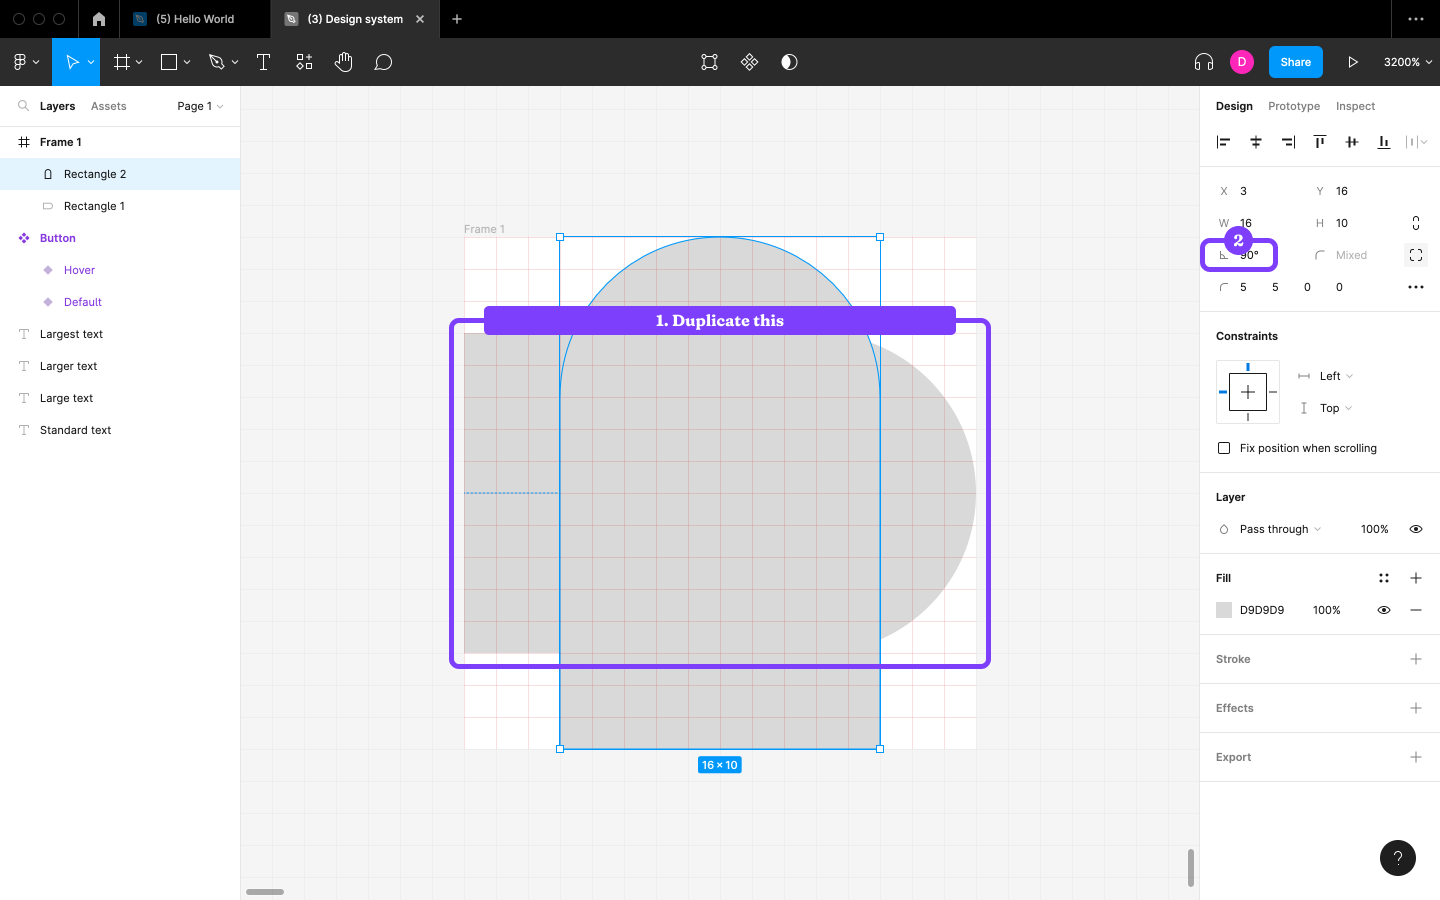
After that, snap the Layer to the left fringe of the Physique and the choice Layer to the underside fringe of the Physique, after which, with each Layers chosen, click on on on on the “Union different” icon contained in the horizontal toolbar to fuse the Layers correct proper right into a single Layer.
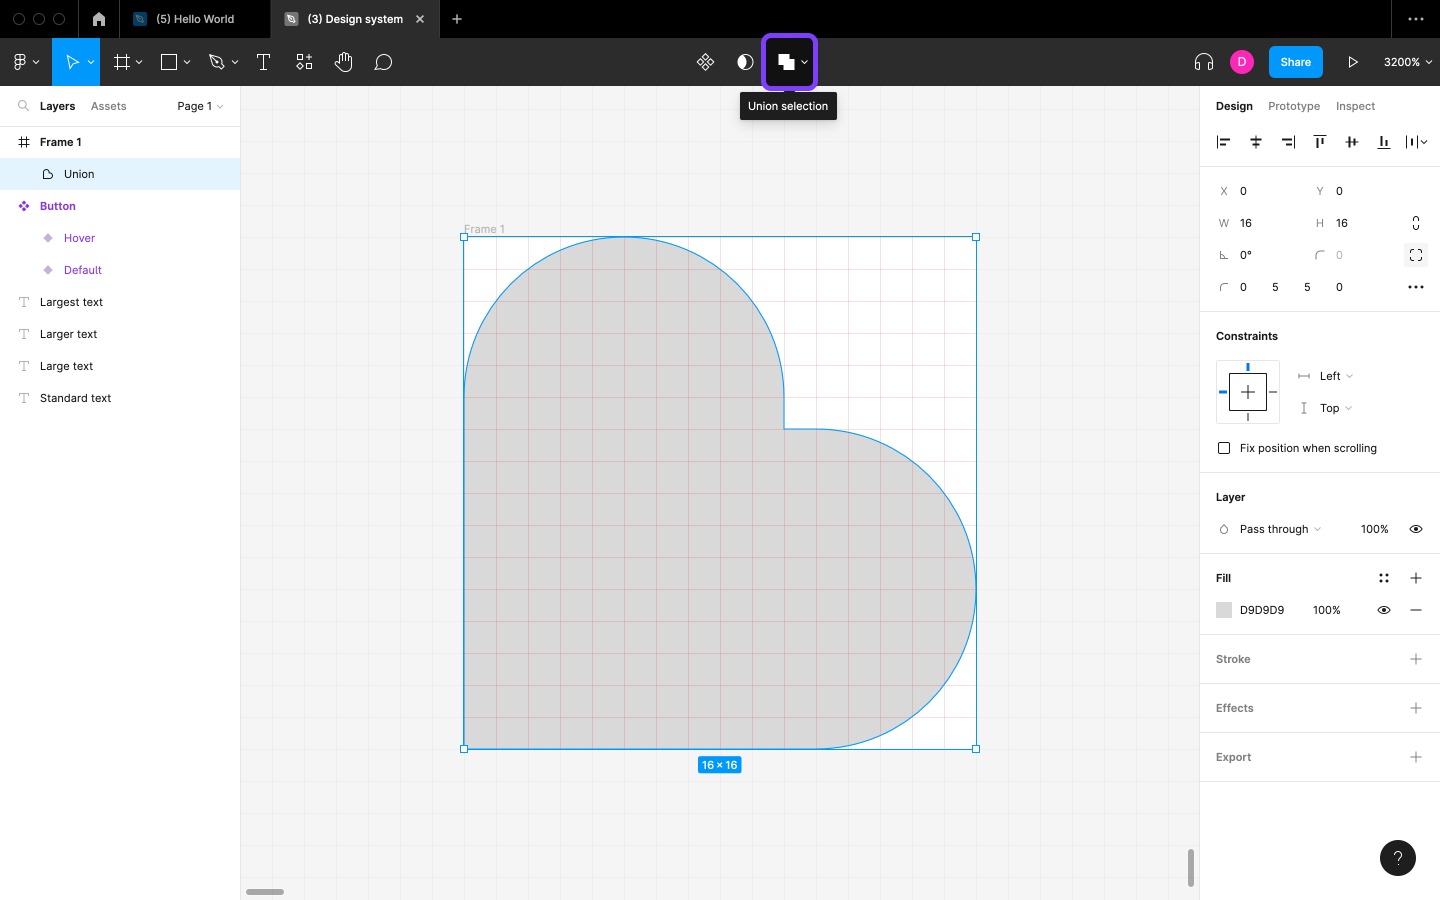
Change the “Rotation” to 45—and that’s the middle form achieved.
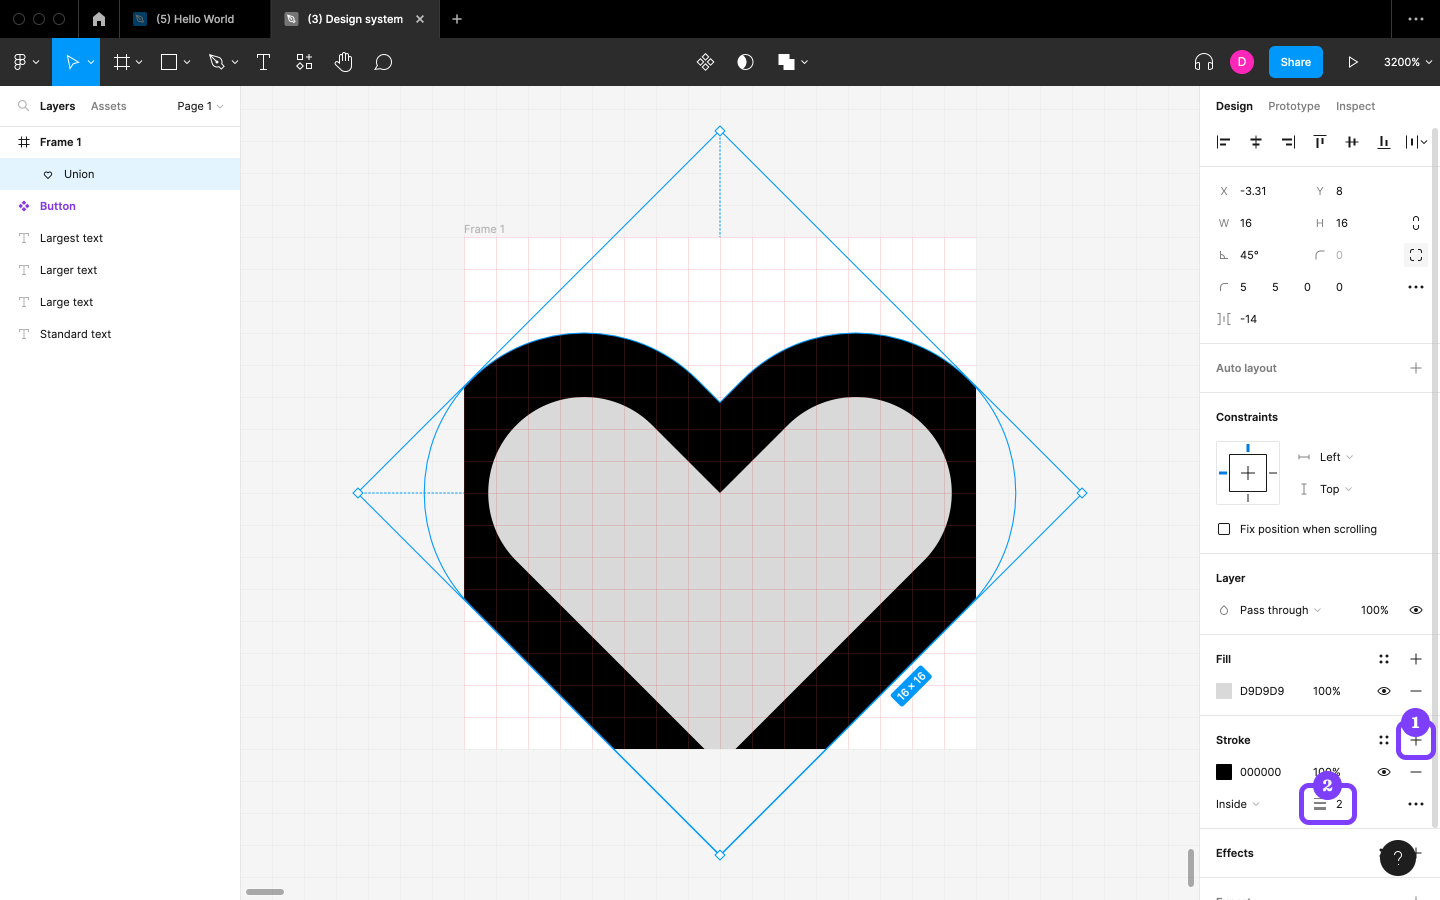
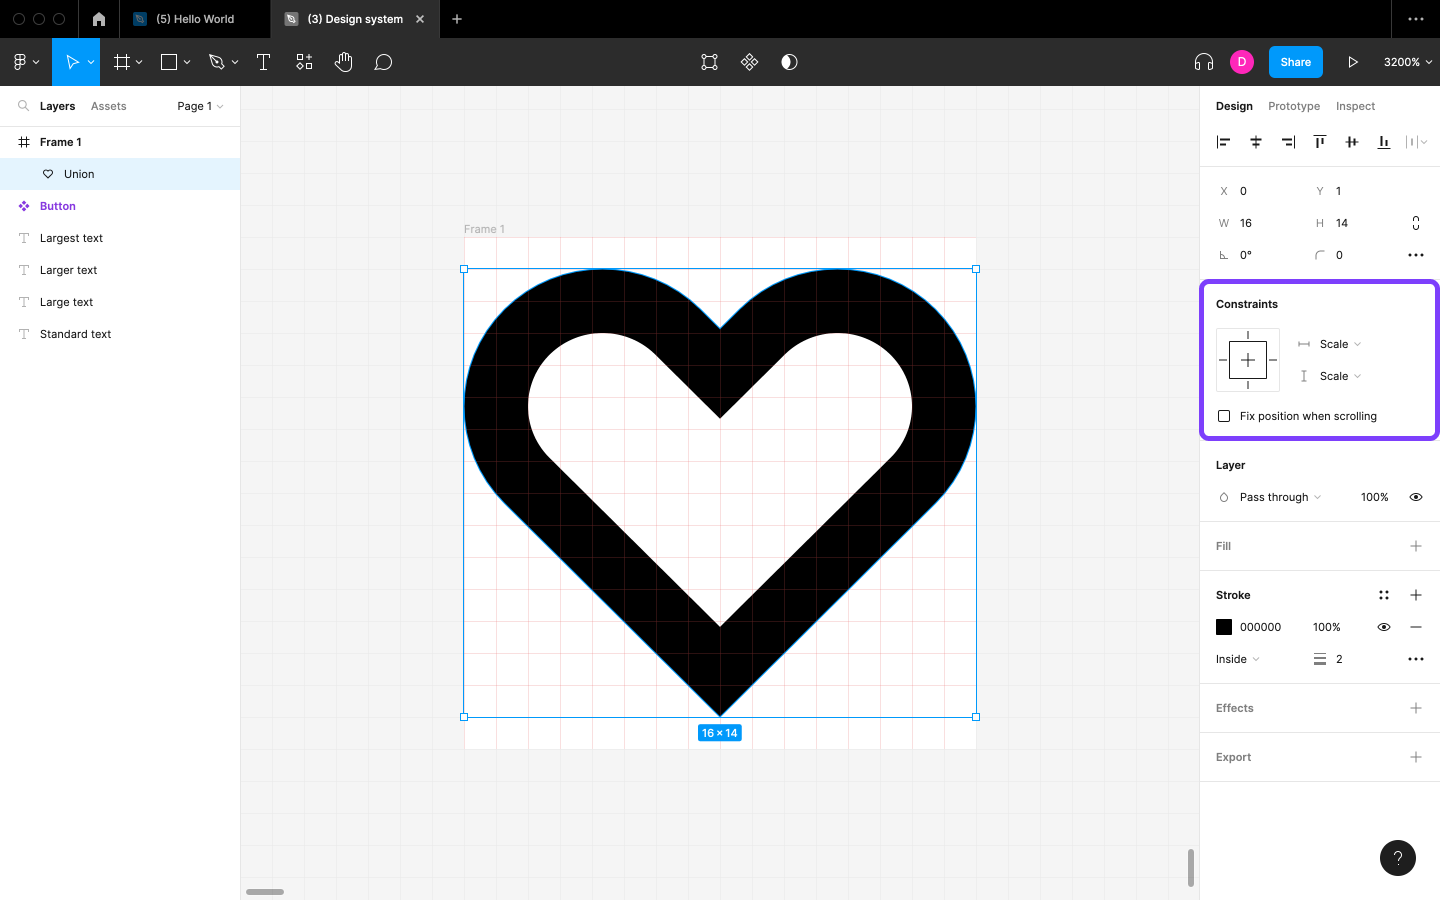
Earlier than we make the middle form match into the Physique, add a Stroke (border) by clicking on the + icon subsequent to “Stroke” contained in the Design panel, deciding on 2 for the “Stroke width”. Shortly, this may occasionally present us the prospect to make the most of outlined icons together with stuffed icons.
Uncover: to level out icons at a specific dimension, it’s most attention-grabbing to scale them barely than resize them. The excellence is that the Scale machine—beneath the “Change units” icon contained in the horizontal toolbar (Okay)—furthermore scales sizes resembling Stroke width proportionally, whereas resizing doesn’t have an effect on sizes resembling Stroke width.
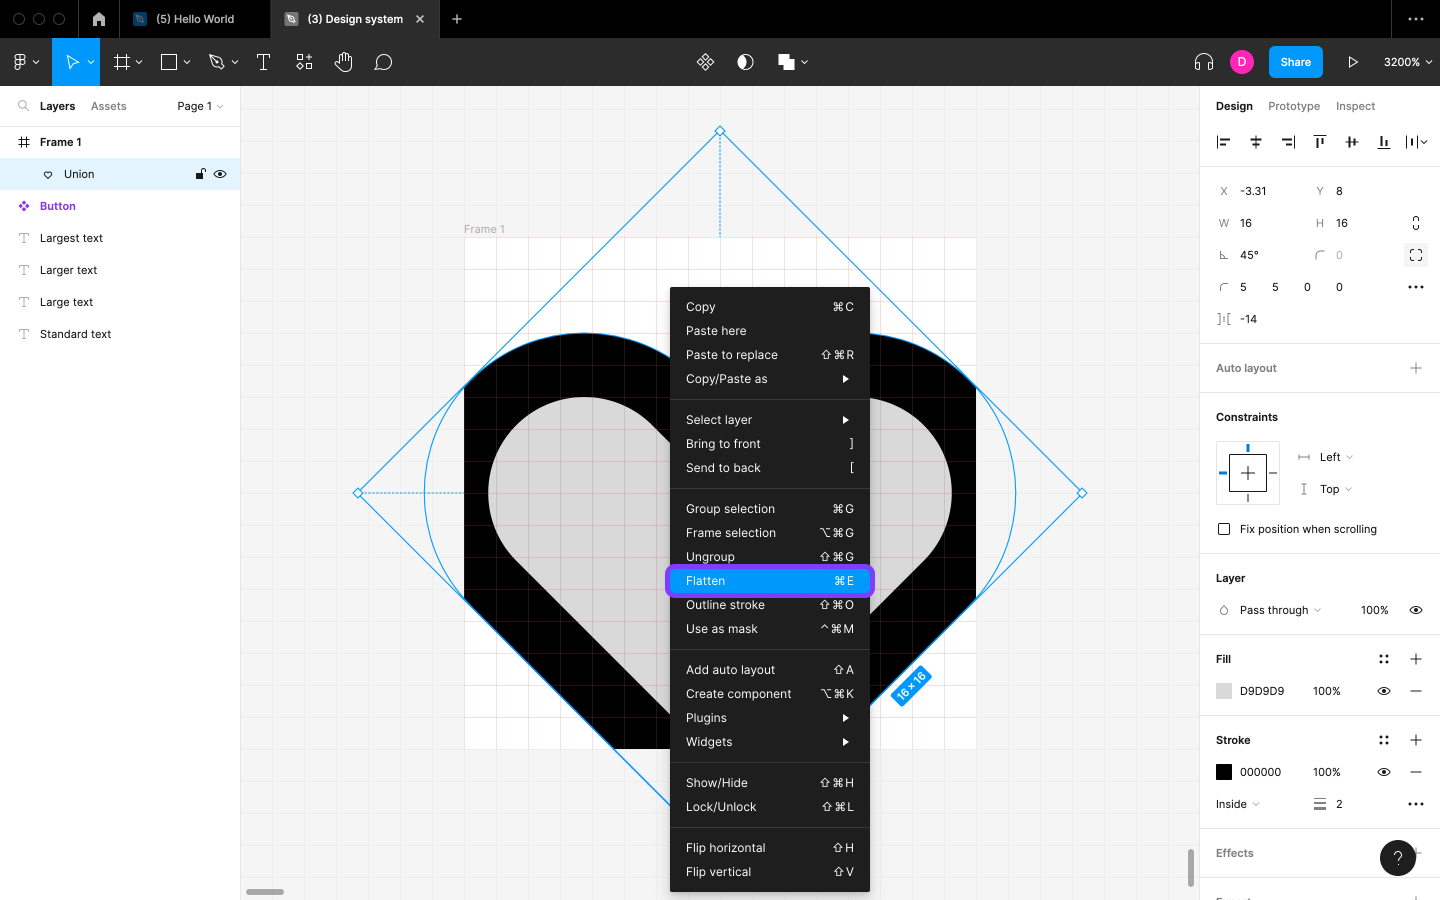
Subsequent, right-click on the icon, after which select Flatten (command + E / ctrl + E). We’ll see that, whereas the Rotation is not in have an effect on, the Layer stays how we set it, which signifies that we’ll now resize it horizontally and vertically in its place of diagonally (which yields an odd have an effect on).
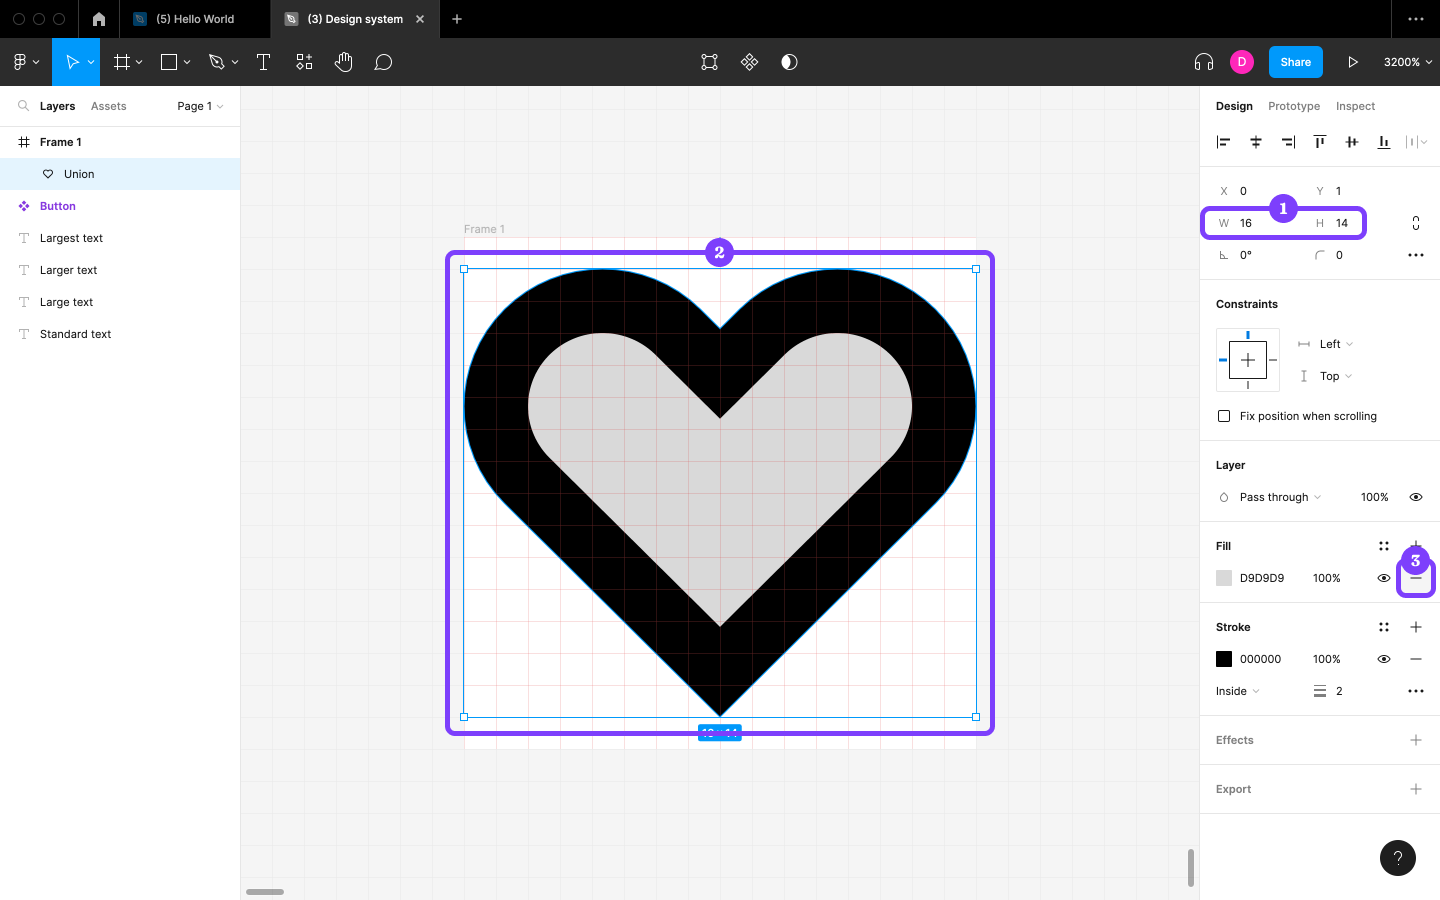
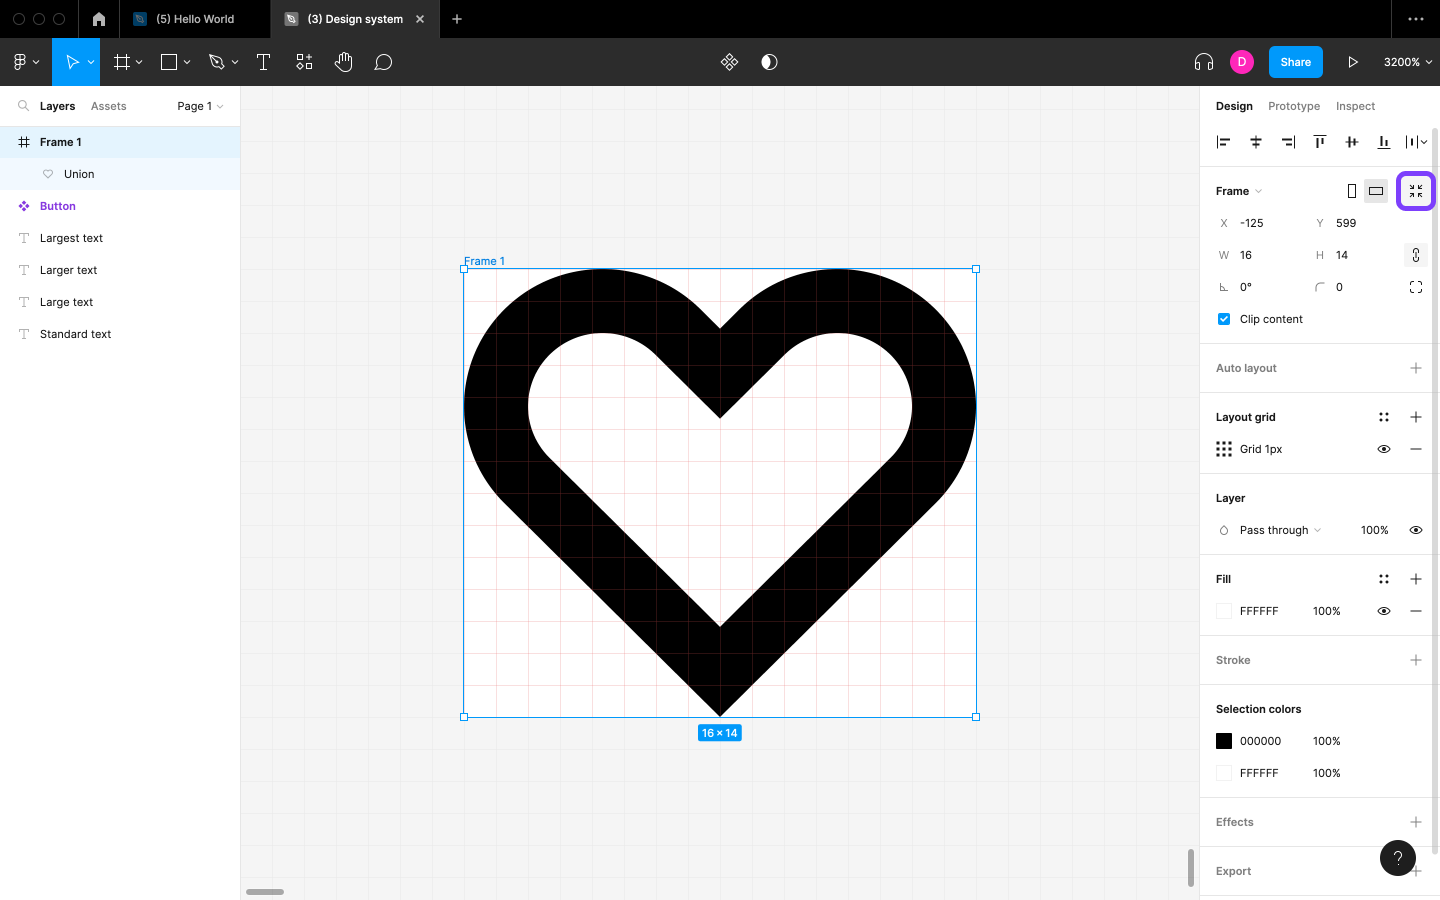
After that, click on on on on the “Constrain proportions” icon contained in the Design panel, set essential dimension (which have to be “W”) to 16click on on on on the “Constrain proportions” icon as rapidly as extra (in order that the scale are normally not constrained), throughout the “H” all the easiest way all the way in which all the way down to 14 (in order that the icon solely fills full pixels), drag-snap it into the middle of the Physique, after which click on on on on the — icon contained in the Fill half to take away the Fill.
When designing icons, we must always all the time on a regular basis attempt to make use of all accessible Physique house in order that various icons is likely to be aligned horizontally or vertically if wished. Nonetheless, this isn’t frequently attainable, so it’s okay to resize icons barely when needed. Doing so doesn’t have an effect on Stroke width, so we obtained’t want to fret about them wanting inconsistent. To ensure that an icon scales with a Physique as quickly as we resize the Physique, change the “Left” and “Prime” to “Scale” contained in the Design panel (contained in the Constraints half).
Lastly, choose the Physique after which click on on on on the “Resize to swimsuit” icon to trim the detrimental house, thus resizing the Physique.
We now have full icon! We’re able to furthermore strive our hand at drawing from scratch and/or utilizing shapes and modifying them. Nonetheless, it does require fairly just a little bit little bit of experience and time to test. Icon design itself may additionally be very time-consuming, considerably when there are such a lot of free design sources out there in the marketplace. Figma has a video tutorial that walks us by means of this, nonetheless the Font Superior plugin is maybe the right choice for implementing icons at present.
This textual content material is a fast extract from The Designer’s Information to Figma, accessible on SitePoint Premium.
Steadily Requested Questions (FAQs) on Creating Personalised Button Icons in Figma
How Can I Create a Personalised Button Icon in Figma from Scratch?
Making a custom-made button icon in Figma from scratch entails various steps. First, it is important to open a mannequin new file in Figma. Then, choose the ‘Sort’ machine from the toolbar and draw a rectangle on the canvas. It will carry out your button. You may modify the scale, colour, and border radius of the rectangle to fit your design. Subsequent, choose the ‘Textual content material materials’ machine and kind your button textual content material materials. Regulate the font, dimension, and colour as wished. To create the icon, you could possibly every draw it utilizing the ‘Pen’ or ‘Sort’ units, or import an SVG file. As rapidly as a result of the icon is created, place it on the button. Lastly, group the button and the icon collectively by choosing each and clicking ‘Group Choice’ contained in the right-click menu.
Can I Use SVG Information for My Button Icons in Figma?
Sure, you could use SVG data in your button icons in Figma. To do that, merely import the SVG file into your Figma drawback. As rapidly as imported, you could possibly resize, recolor, and reposition the SVG icon as wished. That is normally a superb methodology to utilize pre-made icons in your designs, saving you time and making certain educated look.
How Can I Make My Button Icons Responsive in Figma?
To make your button icons responsive in Figma, it is important to make use of ‘Auto Format’. This carry out permits your buttons to resize robotically based mostly on the content material materials supplies inside them. To utilize Auto Format, choose your button and icon group, then click on on on the ‘+’ button subsequent to ‘Auto Format’ contained in the right-hand panel. You may then modify the padding and spacing as wished.
How Can I Create a Hover Affect for My Button Icons in Figma?
Making a hover have an effect on in your button icons in Figma entails utilizing the ‘Prototype’ carry out. First, duplicate your button and make the required design modifications for the hover state. Then, choose the distinctive button, go to the ‘Prototype’ tab, and create an interplay. Set the set off to ‘On Hover’, the motion to ‘Navigate To’, and the vacation spot to the hover state button.
Can I Create Animated Button Icons in Figma?
Sure, you could possibly create animated button icons in Figma utilizing the ‘Good Animate’ carry out. This lets you animate modifications between utterly completely totally different states of your button. To do that, create utterly completely totally different variations of your button with the modifications you wish to animate. Then, use the ‘Prototype’ carry out to create an interplay between the utterly completely totally different states, and set the animation to ‘Good Animate’.
How Can I Share My Personalised Button Icons with My Group in Figma?
Sharing your custom-made button icons collectively alongside along with your group in Figma is simple. You may invite group members to your Figma file by clicking the ‘Share’ button contained in the top-right nook and getting into into their e-mail addresses. They may then be succesful to view, contact upon, and edit the file based mostly on the permissions you set.
Can I Use My Personalised Button Icons in Completely totally different Figma Duties?
Sure, you could use your custom-made button icons in quite a few Figma duties by making a ‘Issue’. To do that, choose your button icon group and click on on on the ‘Create Issue’ button contained in the right-hand panel. You may then use the ‘Belongings’ panel to entry and use this side in quite a few Figma data.
How Can I Create a Library of Personalised Button Icons in Figma?
To create a library of custom-made button icons in Figma, it is important to create parts for every button icon and publish them to a gaggle library. To do that, choose every button icon group and click on on on ‘Create Issue’. Then, go to the ‘Belongings’ panel, click on on on the ‘Group Library’ button, and publish your parts. Your group can then entry and use these button icons of their designs.
Can I Export My Personalised Button Icons from Figma?
Sure, you could possibly export your custom-made button icons from Figma. To do that, choose the button icon you wish to export, go to the ‘Export’ panel contained in the right-hand sidebar, and select your required export settings. You may export your icons as SVG, PNG, JPG, or PDF data.
How Can I Enhance the Accessibility of My Button Icons in Figma?
Bettering the accessibility of your button icons in Figma entails various steps. First, guarantee your icons are clear and recognizable. Second, use contrasting colours in your buttons and icons to make sure they’re seen to all prospects. Third, ponder along with tooltips or labels to your buttons to offer extra context. Lastly, take a look at your designs with quite a few prospects to make sure they’re accessible and user-friendly.