
Throughout the event you go to my profile on GitHub, you’ll uncover that it accommodates photos, social neighborhood hyperlinks, some GitHub statistics and hyperlinks to my blogs, which makes the GitHub profile stand out. That is attainable by means of the GitHub profile README function. On this textual content, we’ll be taught to create a GitHub profile README.
We’ll cowl the next:
- what a GitHub profile README is
- the way in which wherein to create a GitHub profile README
- along with social badges, expertise and descriptions about oneself
- along with GitHub stats
- making a GitHub workflow to tug newest revealed blogs
To observe together with the tutorial, you’ll might want to have a significant understanding of HTML and Markdown. Throughout the event you’d like an introduction to Markdown, take a look at this Markdown introduction. Furthermore, it is important to have a GitHub account. Throughout the event you don’t have one nonetheless, be part of at GitHub.
The code for this tutorial is obtainable on GitHub.
Key Takeaways
- Begin with the Fundamentals: Start by making a particular repository alongside collectively together with your GitHub username to accommodate your README.md, guaranteeing it’s seen and set to public.
- Improve Seen Enchantment: Incorporate GIFs, badges, and a banner to make your profile visually participating. Revenue from platforms like Shields.io for creating social media badges and Giphy for dynamic GIFs.
- Showcase Your Expertise: Facet your technical expertise and gadgets utilizing photos from sources like DevIcons, and supply a succinct ‘About Me’ half to personalize your profile.
- Current GitHub Stats: Add widgets like GitHub Streak Stats and GitHub Readme Stats to point your coding prepare and most used languages, enhancing your profile’s credibility.
- Automate Content material materials supplies Updates: Implement a GitHub workflow to routinely change your profile alongside collectively together with your newest weblog posts, preserving your content material materials supplies present and related.
- Preserve It Organized and Up to date: Recurrently change your README to duplicate your newest duties and achievements, guaranteeing the content material materials supplies stays present and arranged for straightforward navigation.
What a GitHub Profile README Truly Is
A GitHub profile README is a function of GitHub that enables purchasers to make the most of a Markdown file named README to jot down particulars about themselves identical to their expertise, pursuits, GitHub stats and showcase it to the GitHub group. It’s confirmed on the extreme of your GitHub dwelling internet net web page, above the pinned repositories. That is normally a elaborate method to showcase one’s expertise and stats on GitHub.
Pictured beneath is the final phrase look of the GitHub profile that we’ll create for this textual content material.

We’ll divide this into loads of sections and add contents for every half incrementally. The background coloration will change based totally completely on the GitHub theme settings of the customer.
Inside the next half, we’ll have a look on the steps for creating the README file.
Making a GitHub Profile README
The README file resides in a GitHub repository, the title of which is similar because of the username of your GitHub account. To create the repository, observe these steps:
- Log in to GitHub.
- Click on on on on + icon at extreme appropriate of the web net web page and choose New Repository.

- A Create a mannequin new repository internet net web page opens. Contained in the Repository title self-discipline, enter the username of your GitHub account. After coming into the username, GitHub reveals a message describing that you just simply’re about to create a GitHub express repository.
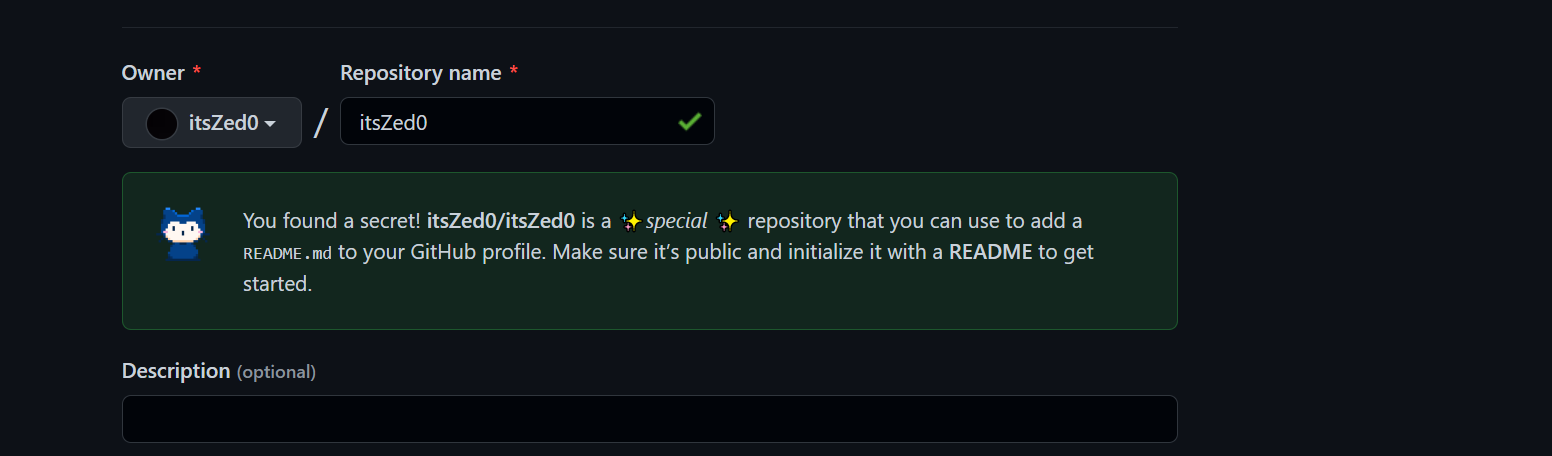
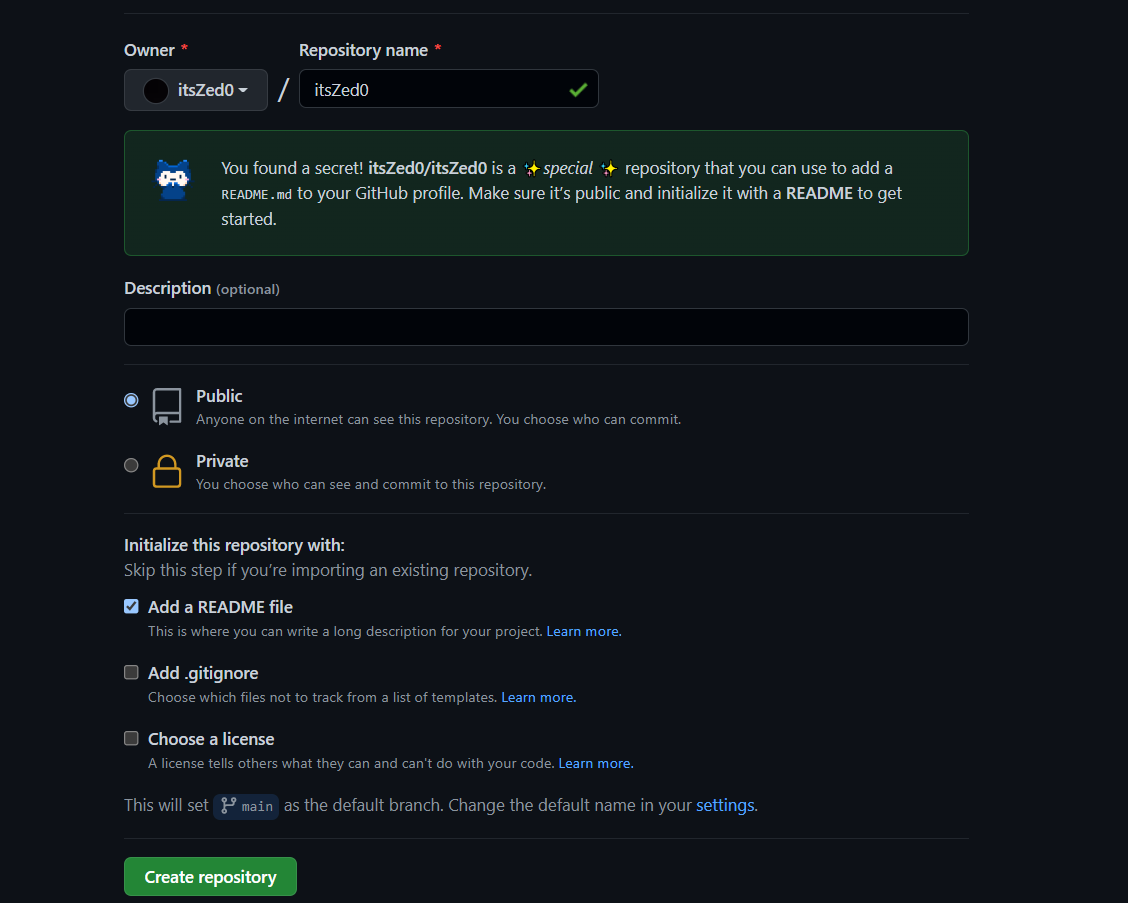
- Take a look at the Public checkbox beneath repository type to make the GitHub profile README seen to all individuals who visits the GitHub profile internet net web page. Throughout the event you don’t need purchasers to see your GitHub profile README whereas it’s nonetheless in enchancment, you possibly can select Private. When you’re achieved together with your full enchancment of your README, you must positively alter the visibility to Public.
- Take a look at the Add a README file checkbox. This might add a
README.mdfile the place we’ll add the profile contents. The sphere values ought to look very like thepicture beneath.
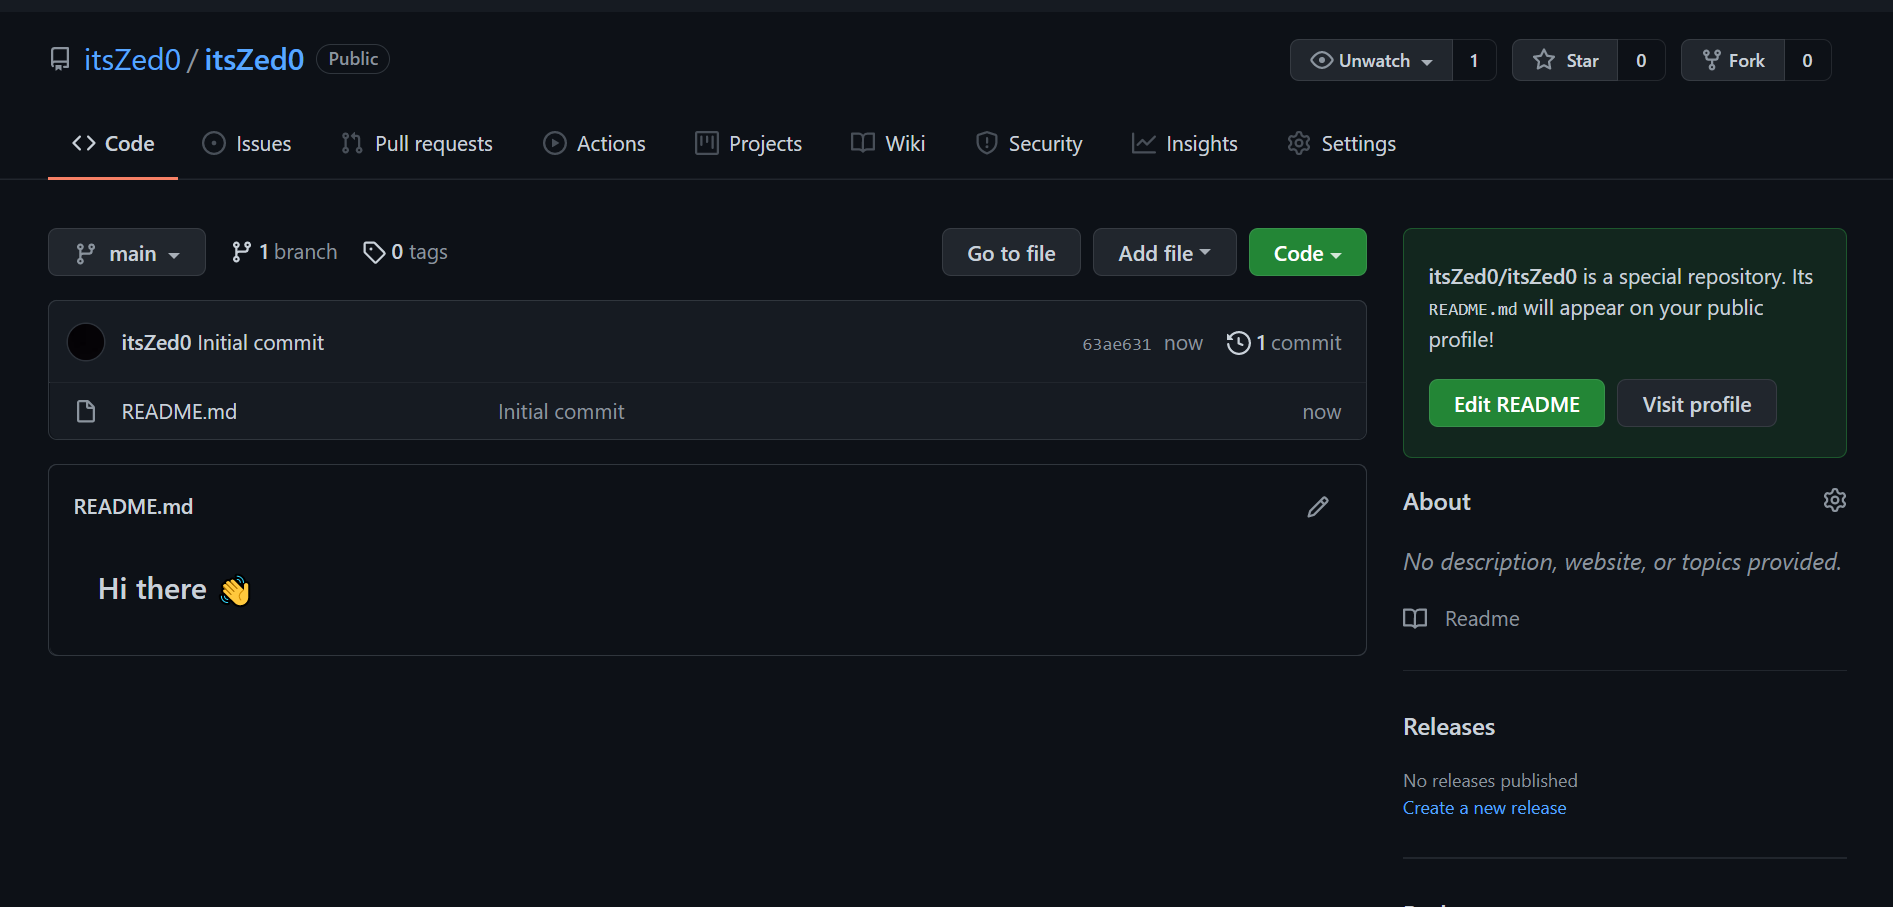
- Click on on on on the Create repository button. A specific repository is created successfully. Go to the repository you merely created and likewise you’ll see a
README.mdfile added to the repository.
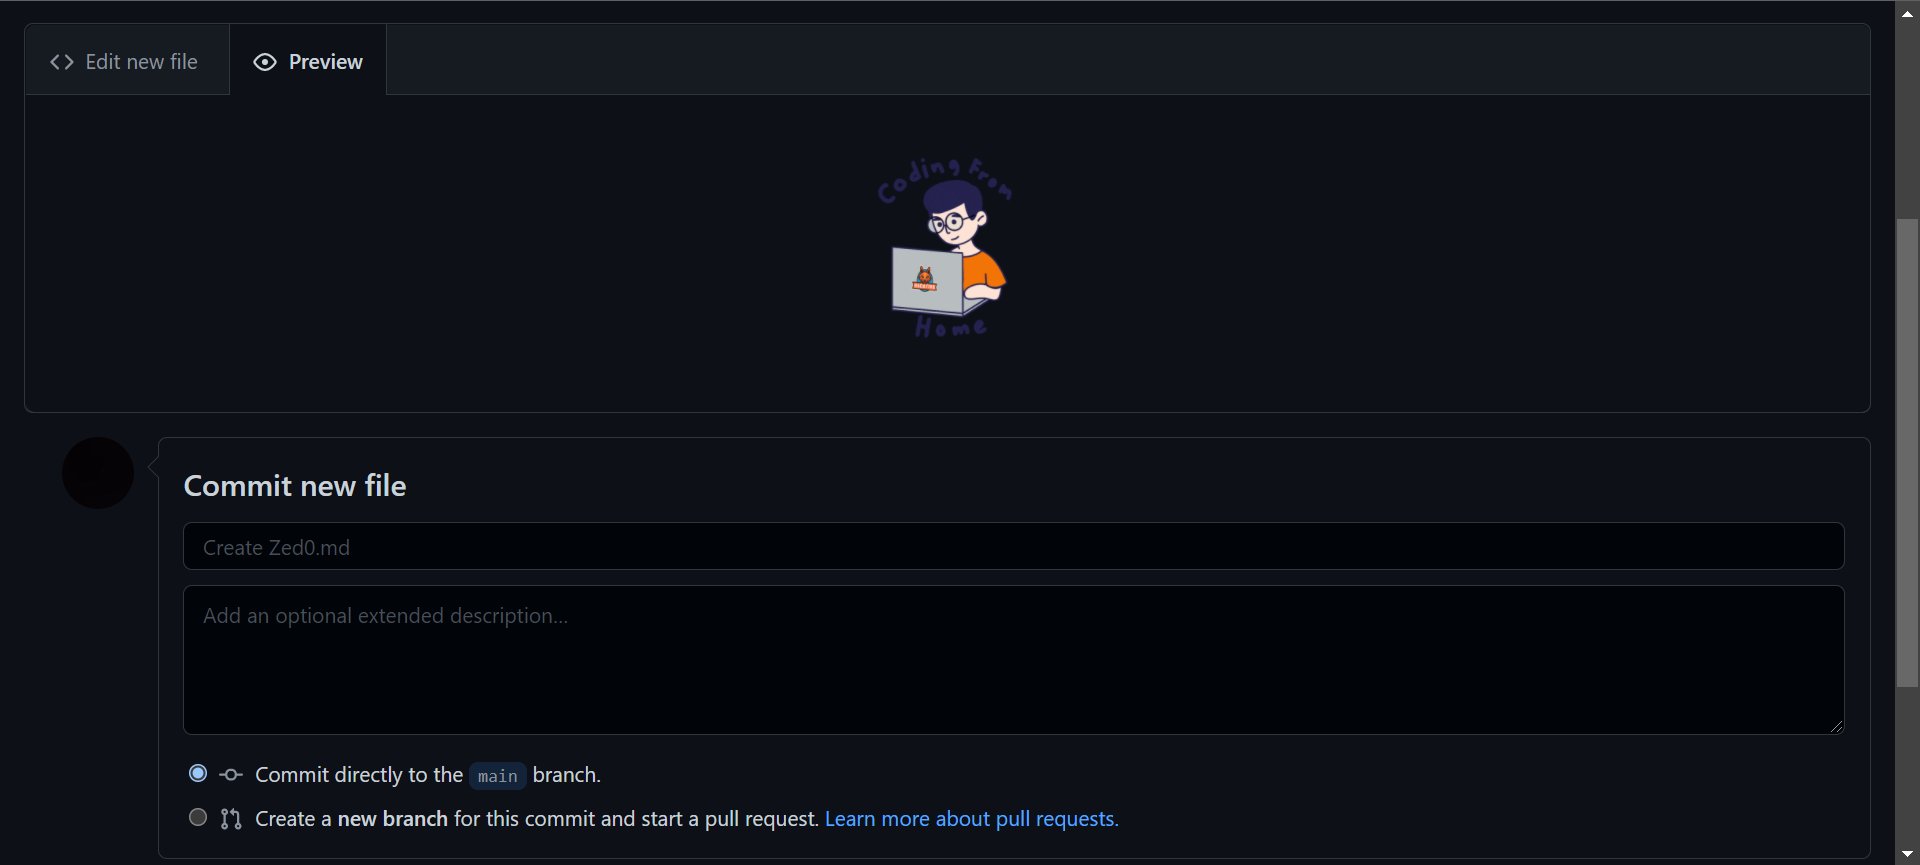
Inside the next few sections, we’ll add contents to our README.md file. We’ll use GitHub’s file editor to jot down and preview the modifications. It is best to make use of one different textual content material materials editor you’re cosy with.
To make the most of the GitHub file editor, open README.md and click on on on on the Edit this file icon (a pencil icon) on the easiest appropriate of the web net web page. You most likely will be taught extra about enhancing GitHub recordsdata on the official GitHub documentation on enhancing recordsdata.
Along with GIFs and Badges to Your GitHub Profile README
Correct proper right here’s a picture of the content material materials supplies that’s more likely to be added on this half:

The GIF used on this half will possible be discovered correct proper right here. I discovered this GIF on Giphy, which is filled with free GIFs to make the most of.
Go to the GIF Hyperlink and click on on on on the Share button after which Copy GIF Hyperlink. We’ll add this copied hyperlink to an HTML img tag to point it all through the Markdown file. We’re utilizing the img tag because of it’ll assist us specify the width of the picture.
Contained in the GitHub file editor, alternate the README.md file content material materials supplies with the next code:
The src attribute elements to the URL we copied all through the sooner step. Since all of the contents on this half are center-aligned, we’ve wrapped the picture in an HTML div tag with the align="coronary coronary heart" attribute.
Observe: GitHub converts the README Markdown to HTML and renders it on GitHub. After conversion, the HTML is sanitized, and for safety causes, it ignores constructive HTML tags and attributes identical to , , pattern and so forth. For that goal, we’ve used an align attribute instead of CSS.
Now go to the preview tab. Pictured beneath is the output we get.
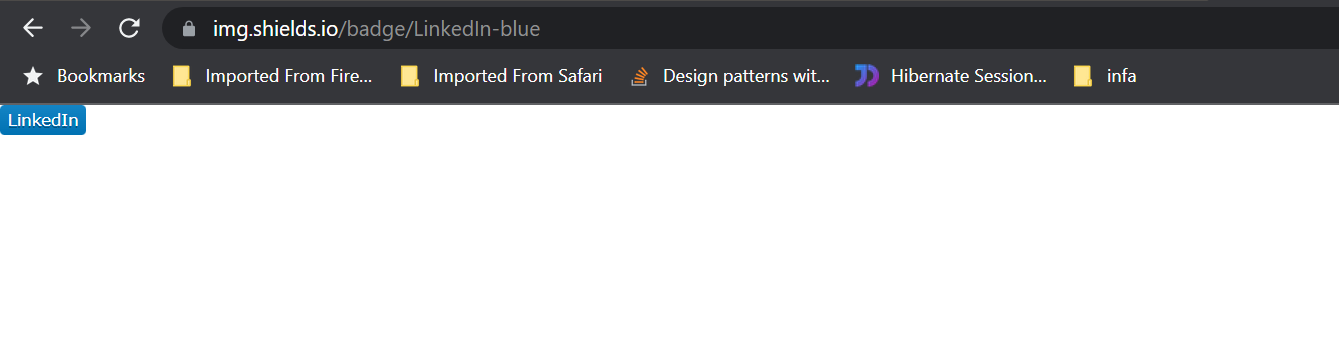
Subsequent, we’ll add social neighborhood badges. On clicking the badge, it would redirect to the respective social networking internet sites. You most likely can add social badges of assorted net pages like Instagram, Fb, Twitter, and so forth. For this tutorial, we’ll add three: Twitter, YouTube and LinkedIn.
To get the respective badges for every social neighborhood, we’ll use Shields.io, which provides assorted endpoints letting purchasers create and customise social badges. We’ll use the https://img.shields.io/badge/ URL and cross extra parameters to this URL to get the respective social badges.
The primary parameter we’ll cross is of the next format:
Label-Coloration
Label is the social neighborhood web site title confirmed on the badge.Coloration is the colour of the badge.
For the three social networks, the values for this parameter is more likely to be:
- LinkedIn: LinkedIn-blue
- Twitter: Twitter-blue
- YouTube: YouTube-red
When blended with https://img.shields.io/badge/, the next URL is created for LinkedIn:
https://img.shields.io/badge/LinkedIn-blue
After coming into the above URL all through the browser, we get the next output:
Observe that we don’t have the icon for the badge added nonetheless. So as in order so as to add it, we’ll use two question parameters all through the next format:
mannequin={your social neighborhood icon title}
logoColor={coloration of the icon}
We’ll add each the parameters to the URL as beneath:
https://img.shields.io/badge/LinkedIn-blue?mannequin=linkedin&logoColor=white
We’ll furthermore add a way parameter to the above URL. There are fairly a number of styling choices available on the market, the small print of which yow will uncover at Shields.io. We’ll use for-the-badge styling.
The final phrase URL for LinkedIn is more likely to be:
https://img.shields.io/badge/LinkedIn-blue?mannequin=linkedin&logoColor=white&pattern=for-the-badge
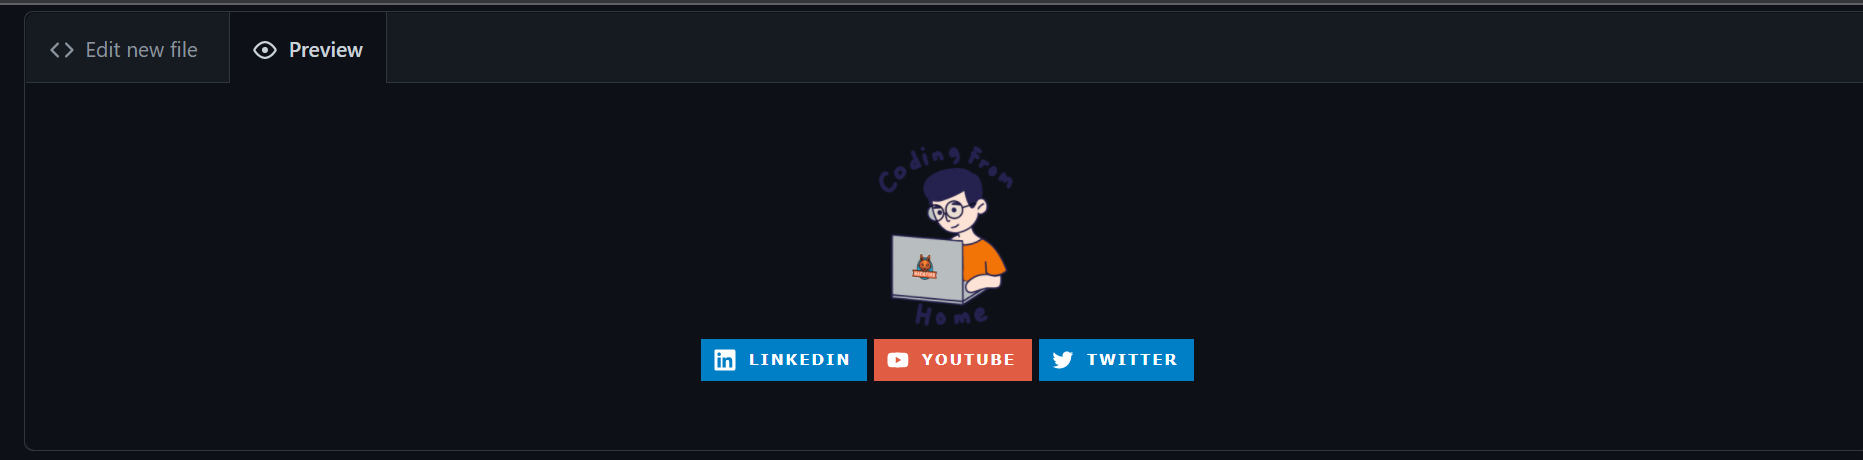
Now, after we hit this URL all through the browser, we get the output pictured beneath.

Equally, we create URLs for numerous badges:
https://img.shields.io/badge/YouTube-red?pattern=for-the-badge&mannequin=youtube&logoColor=white
https://img.shields.io/badge/Twitter-blue?pattern=for-the-badge&mannequin=twitter&logoColor=white
We’ll wrap every URL in img tag like so:
We’ve wrapped the images in
Add the beneath code contained inside the
id="header" and after the GIF ![]()
href attribute to stage to your social profiles:
Pictured beneath is the output we get.
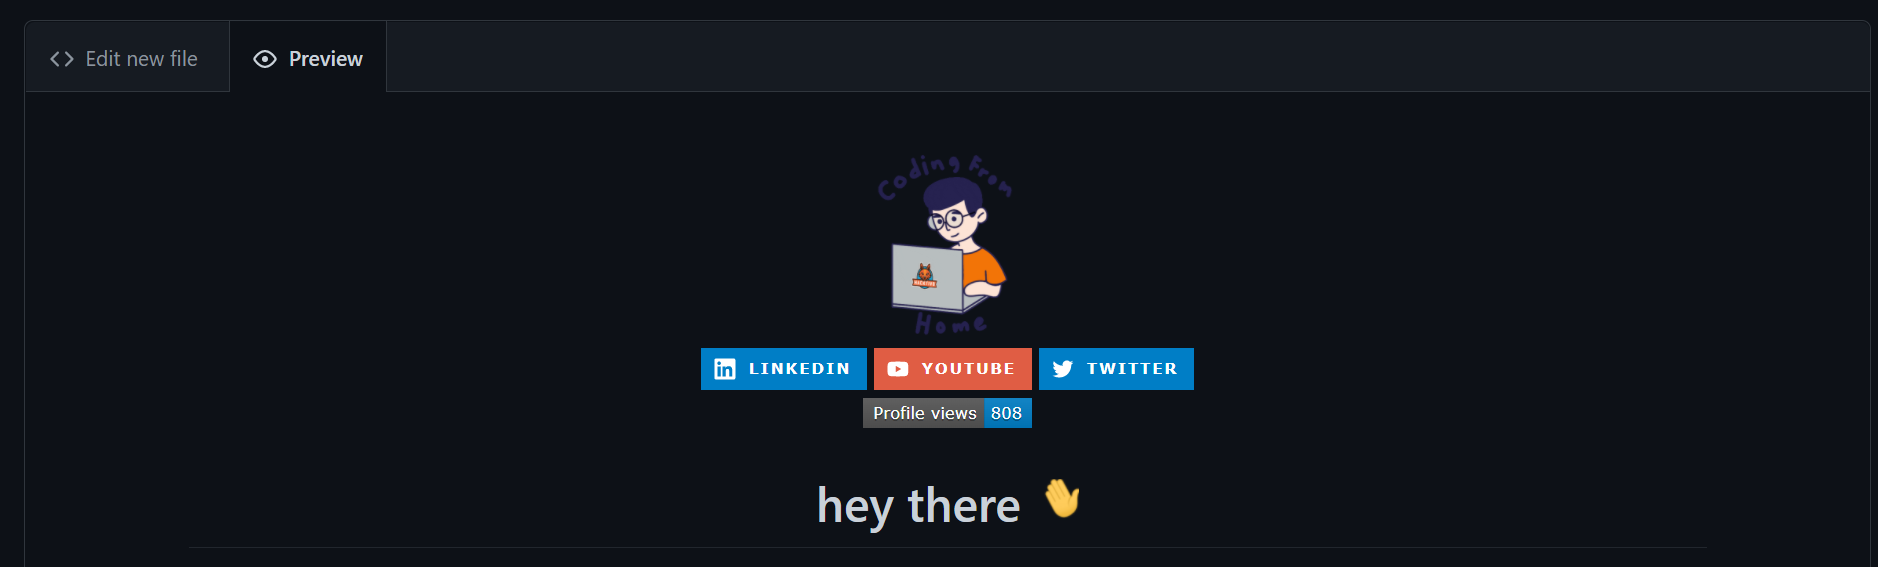
Subsequent on this half, now we have a profile views counter. It counts the variety of visits your GitHub profile will get. We’ll use an open-source enterprise that gives the view-counter badge, the documentation of which is obtainable at GitHub Profile Views Counter. We use it within the an identical technique we used the social badges. Beneath is the endpoint for a similar. We’ll furthermore added some styling parameters to this URL:
https://komarev.com/ghpvc/?username=your-github-username
Add the beneath code after the
id="badges". Ensure that to change your-github-username alongside collectively together with your username:

Pictured beneath is the output we get.

The final word a part of this sections is textual content material materials with a wave (:wave:) GIF. The GIF is taken from Giphy and can possible be discovered correct proper right here.
Add the beneath code after the profile view counter
hey there

The output is pictured beneath.
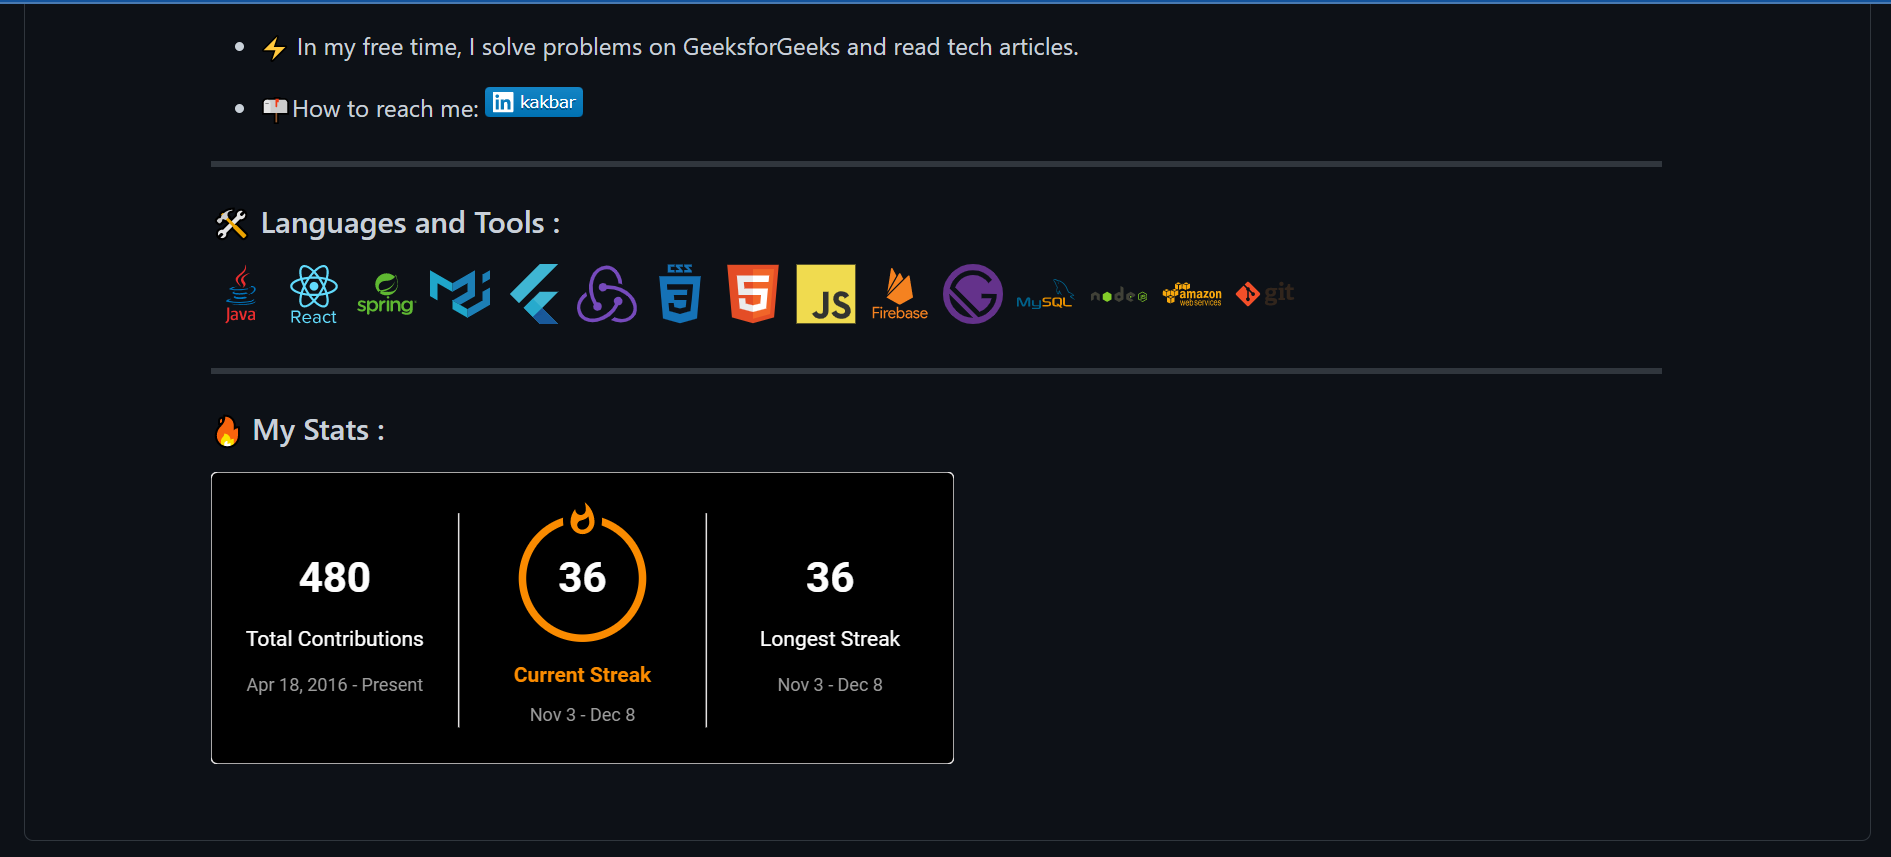
Save the modifications by clicking on the Commit modifications button. This completes the primary part of the GitHub profile README. Let’s change to along with extra content material materials supplies to our README.md file.
Along with a Banner GIF and About Me Half
Correct proper right here’s what we’ll be along with to our profile internet net web page on this half:
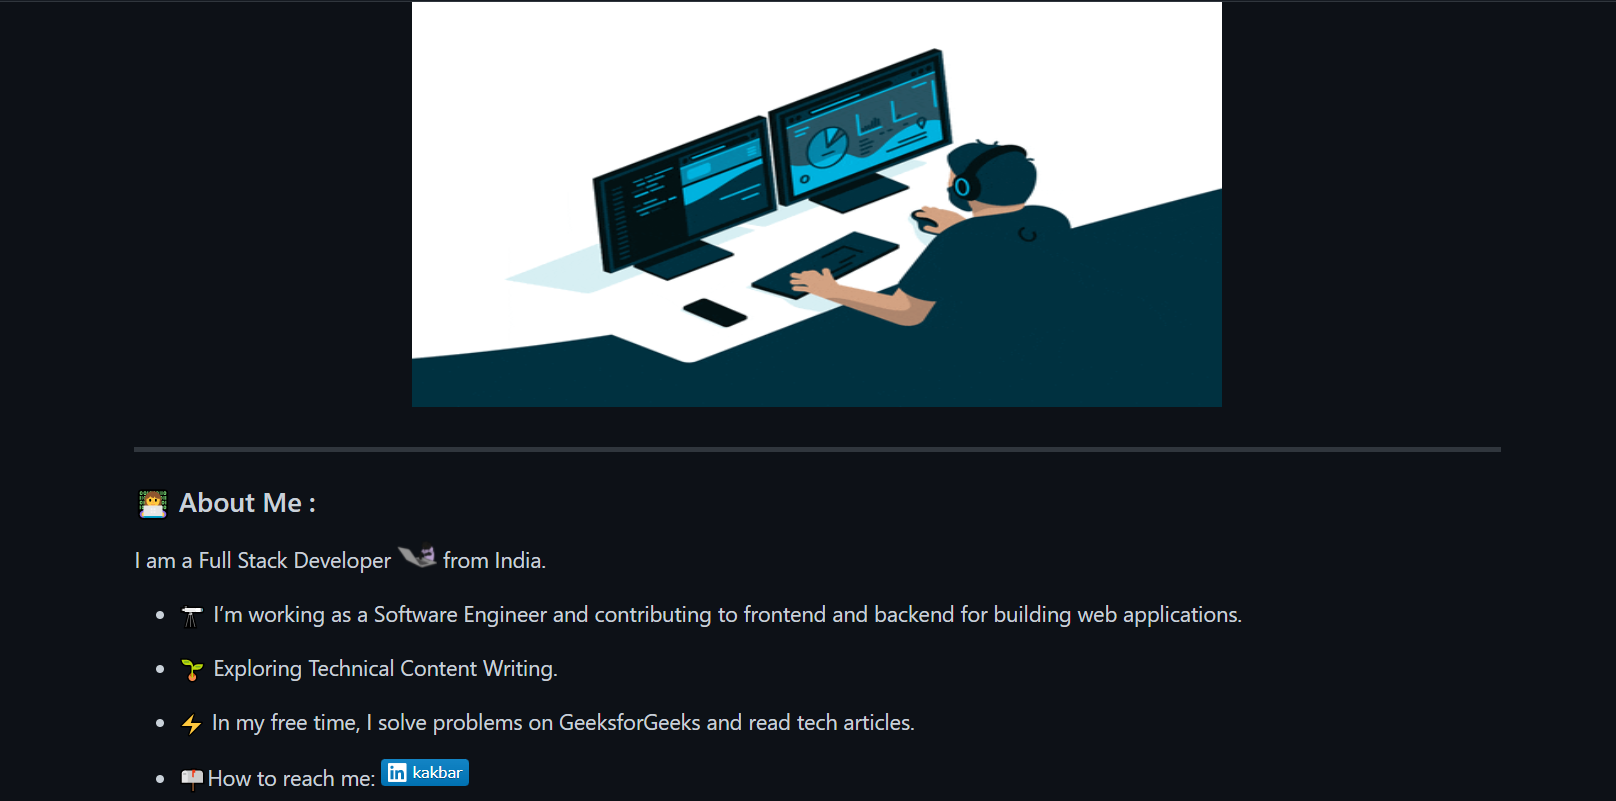
On this half, we’ll add GIF and a few phrases describing particulars about ourself. You presumably can uncover the GIF correct proper right here.
So as in order so as to add the GIF, we’ll use an
align="coronary coronary heart". Add the next code to your README.md file:

The output of that is confirmed beneath.

Subsequent, we’ll add the contents for the About Me half. For the outline textual content material materials we’ll use Markdown syntax, as we don’t want any kind of alignments. Append the beneath code in README.md:
---
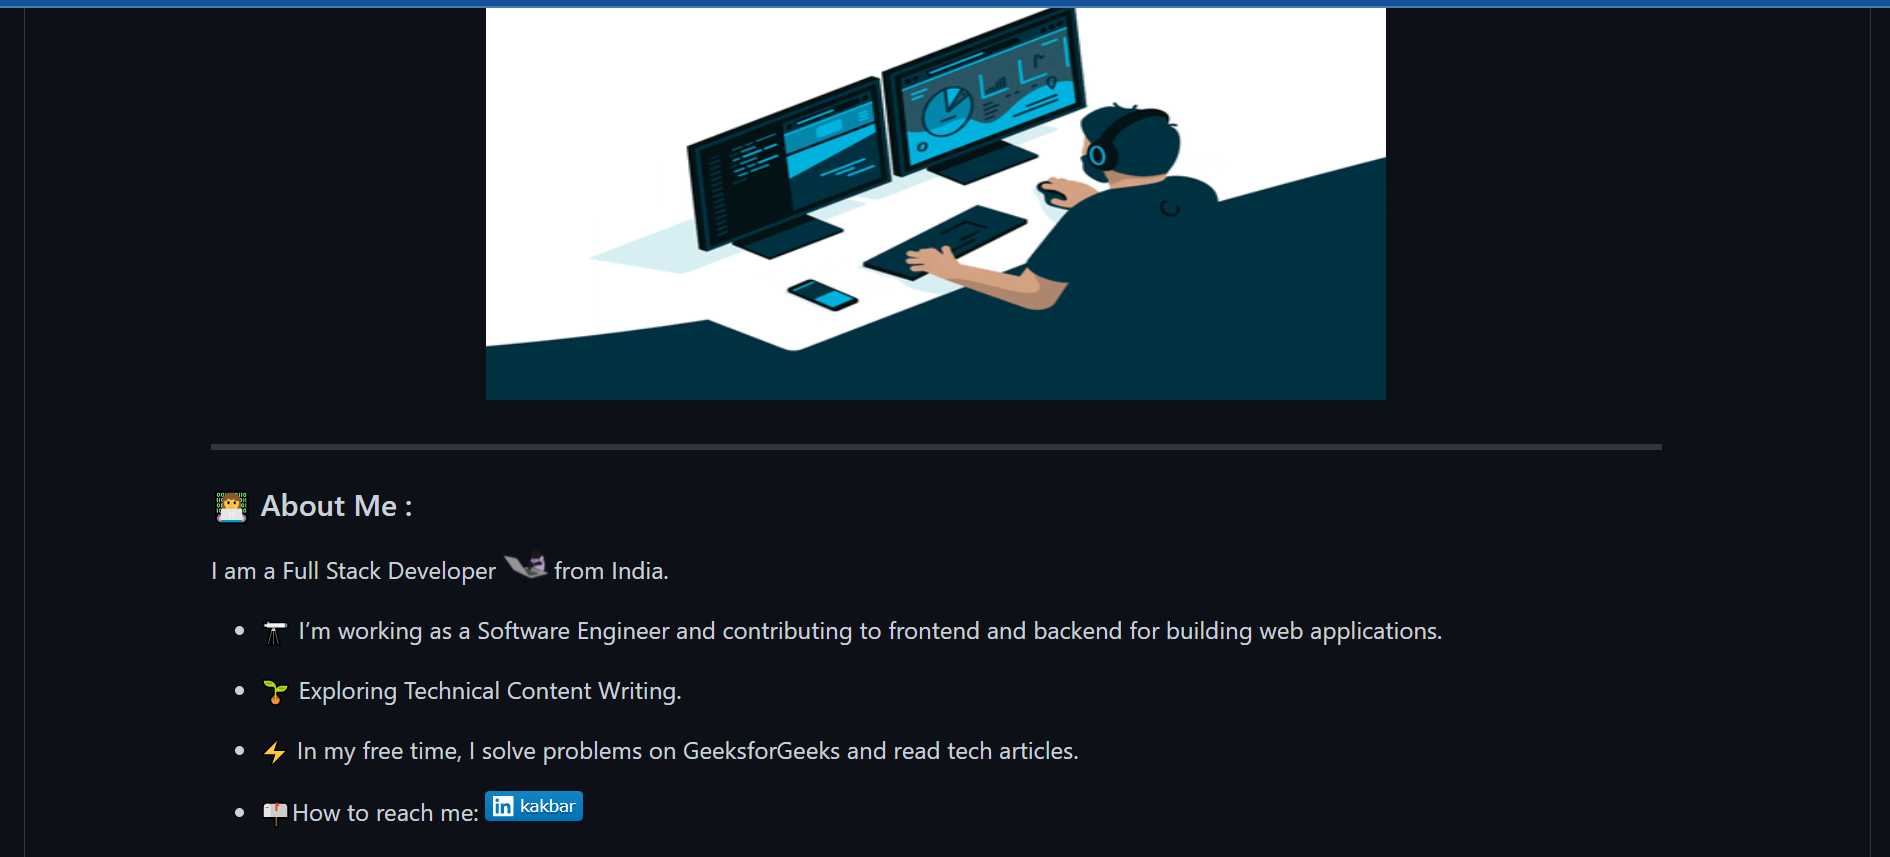
### :woman_technologist: About Me :
--- is so as in order so as to add a horizontal rule before a mannequin new half. A horizontal rule in Markdown must be surrounded by clear strains. :woman_technologist: is the shortcode for the emoji used. For a male model, it's best to make use of :man_technologist:. For others, it's best to make use of :technologist:. You presumably can uncover a itemizing of emojis and the corresponding shortcodes all through the GitHub repo.
Subsequent, we’ll add a private one-line introduction and use a wave (:wave:) GIF. Append the beneath code to README.md:
I'm a Full Stack Developer  from India.
Subsequent is an inventory of issues about your self. To level out an inventory, we’ll use - Markdown syntax. We’ll furthermore prefix every line with an emoji. Add the next code to README.md and make modifications in keeping with your profile. Furthermore, change your-linkedin-url to your profile URL:
- :telescope: I’m working as a Software program program program Engineer and contributing to frontend and backend for establishing net capabilities.
- :seedling: Exploring Technical Content material materials supplies Writing.
- :zap: In my free time, I resolve factors on GeeksforGeeks and skim tech articles.
- :mailbox: attain me: [](your-linkedin-url)
Observe that all through the last word line, the inside ![]() syntax is to point the LinkedIn badge picture. The outer []() is Markdown hyperlink syntax to make the badge stage to the LinkedIn profile URL. We’ve used Shields.io correct proper right here for displaying a personalized LinkedIn badge. You'll too add one different hyperlinks the place of us can attain out to you.
See the output all through the image beneath.
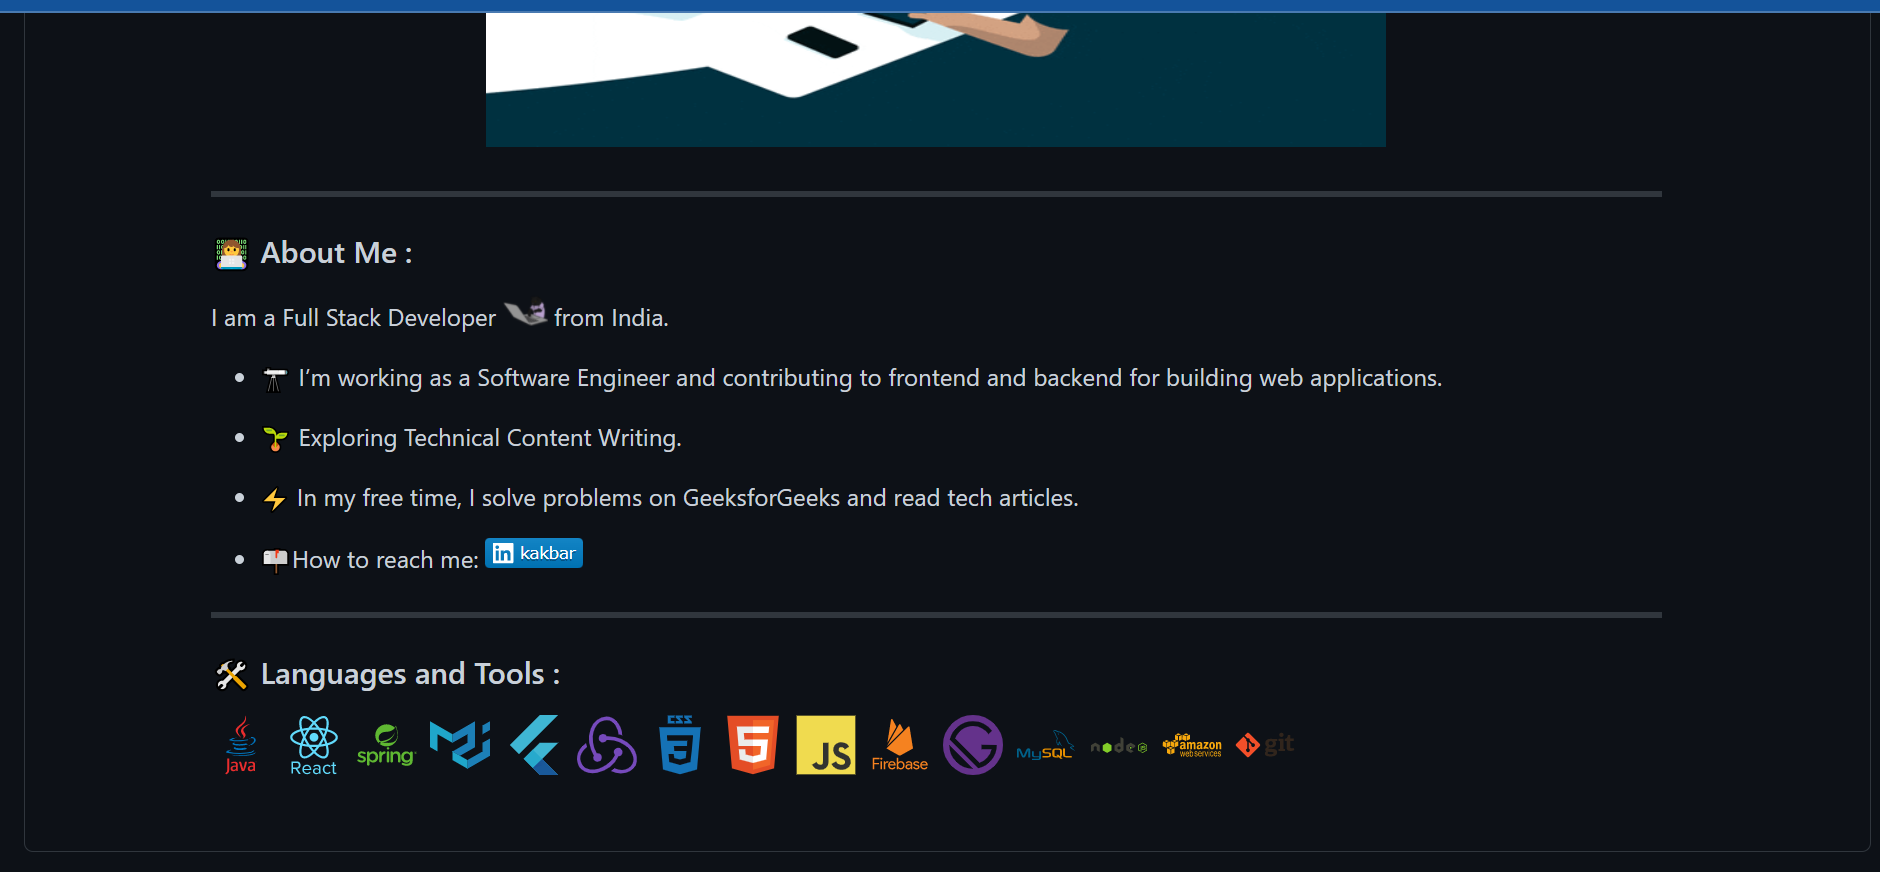
Correct proper right here’s an image of the content material materials supplies that we’ll add on this half.

For the heading, add the next code to README.md:
---

### :hammer_and_wrench: Languages and Gadgets :
We’ll add photos representing utilized sciences and expertise one holds. You presumably can uncover loads of free logos for plenty of languages and gadgets all through the DevIcons GitHub Repository.
Go to the icons folder and search and open the react folder. You’ll uncover photos in SVG and EPS format. Click on on on on any picture and duplicate the URL confirmed all through the browser’s deal with bar.
We’ll use this URL all through the prime and width attribute accordingly. Equally, you possibly can seek for numerous expertise and add them in separate
Append the beneath code to README.md. Add/take away the compulsory expertise you need in your profile:
The outcomes are pictured beneath.
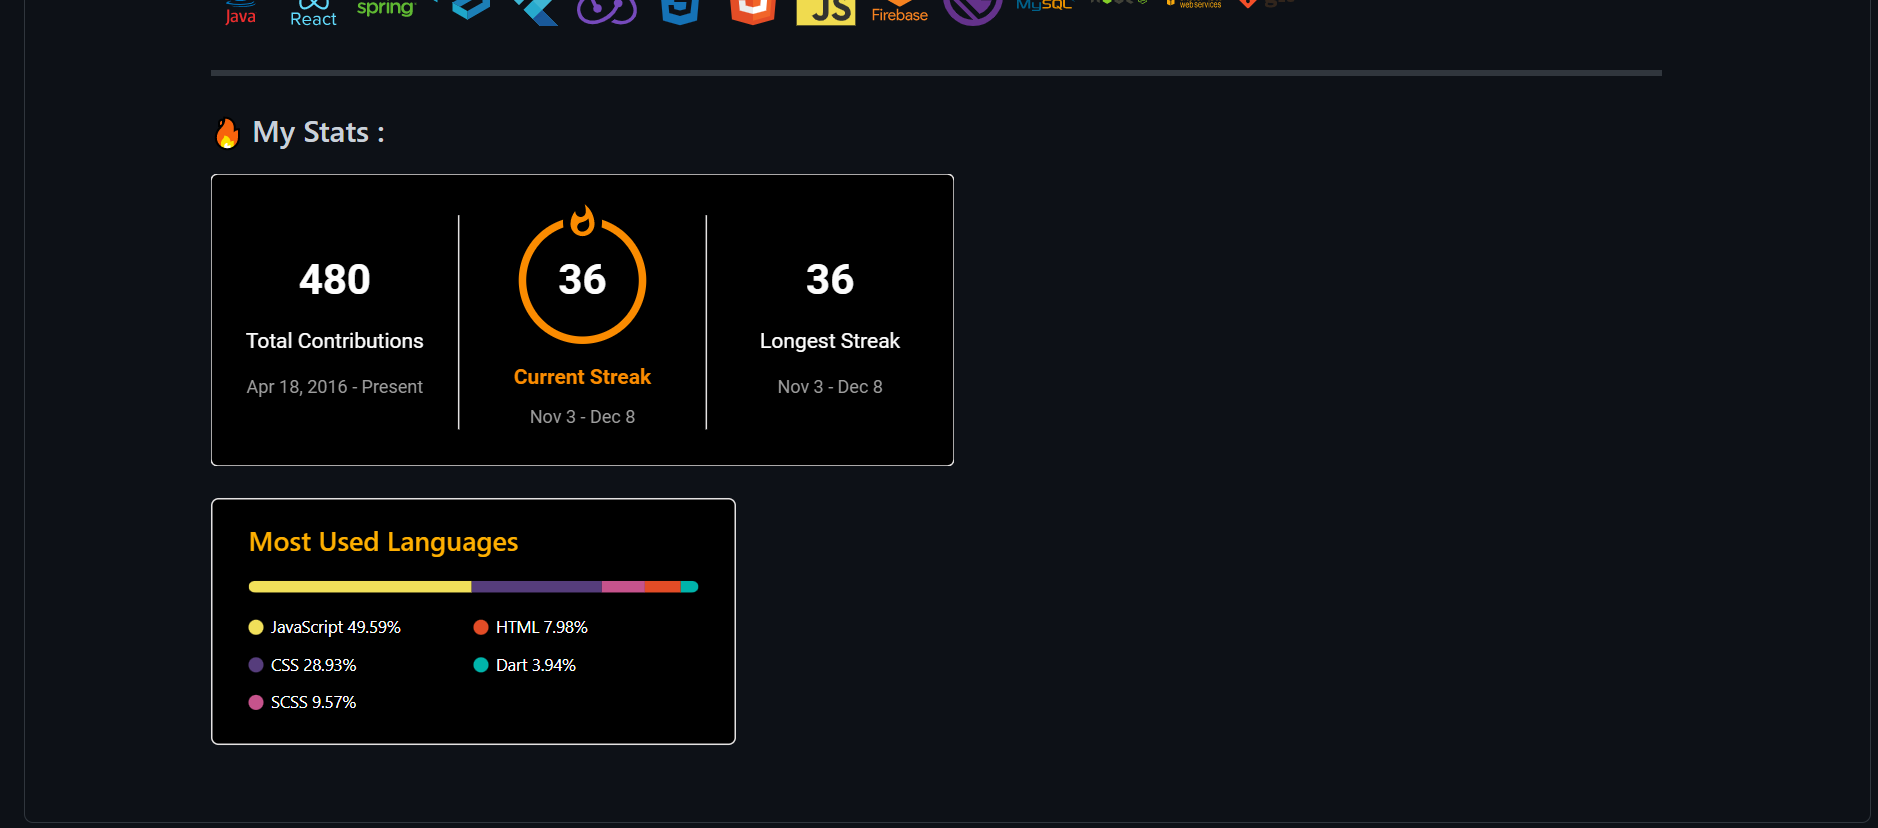
Along with GitHub Stats
Correct proper right here’s a picture of what we’ll add on this half.
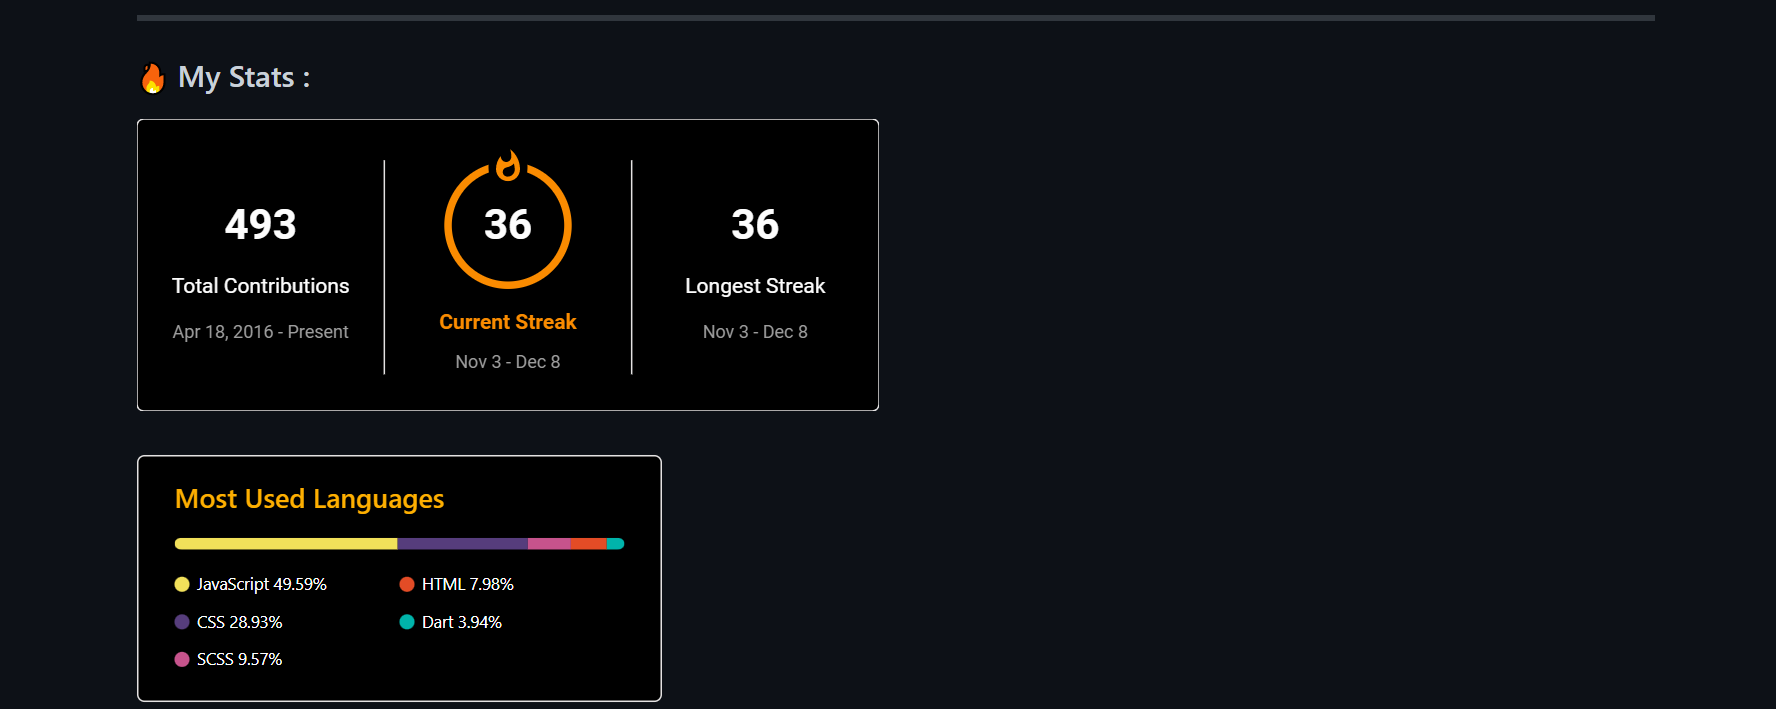
For heading, add the next code to README.md:
---

### :fire: My Stats :
We’ll add some stats concerning the shopper’s GitHub prepare an identical to the variety of commits, variety of PRs, and so forth., to this half. There are various open-source duties on GitHub that current fully completely completely different stats for the GitHub profile. On this tutorial, we’ll see the way in which wherein to utilize two such open-source duties.
The primary open-source enterprise that gives GitHub stats is GitHub Streak Stats. This enterprise presents the next three stats:
- full variety of contributions by a shopper
- longest streak of contributions for a shopper
- present streak stat for a shopper
Entry the stats utilizing the next URL:
https://github-readme-streak-stats.herokuapp.com/?shopper=your-github-username
We're ready in order so as to add customizations like theme, background coloration, and so forth, by along with question parameters to the above URL. Add the next code to README.md. Change the github-username alongside collectively together with your GitHub username:
[](https://git.io/streak-stats)
Correct proper right here’s a preview with itsZed0 because of the username.
We're ready to furthermore use the Streak Stats Web site to generate the URL. To take movement, observe these steps:
- Go to the Streak Stats Web site. Contained in the Username self-discipline, enter your GitHub username. Change the choice fields as wanted.
- When you’ve personalized all of the fields, click on on on on the Submit button.
- After the Markdown is generated, click on on on on the Copy To Clipboard button and add the copied Markdown to
README.md.

The subsequent open-source enterprise that gives some extra GitHub stats of a shopper is GitHub Readme Stats by Anurag Hazra. This enterprise presents many stats, nonetheless for this tutorial, we’ll solely use the one which reveals the easiest languages utilized by the GitHub shopper. Must you wish to uncover and use extra stats from this enterprise, you possibly can bear the detailed documentation available on the market of their repository.
Beneath is the Markdown to point the easiest languages of a shopper:
[](https://github.com/anuraghazra/github-readme-stats)
We're ready to customize it to present a novel coloration, prohibit the utmost variety of languages to degree out, and so forth. For personalization particulars, search suggestion from the GitHub Readme Stats repository.
Add the next code to README.md. Change the your-github-username alongside collectively together with your username:
[](https://github.com/anuraghazra/github-readme-stats)
Pictured beneath is the preview for my itsZed0 account.
Along with Latest Blogs to Your GitHub Profile README
The image beneath reveals what we’re aiming for on this half.

For the heading, add the next code to your GitHub profile README.md:
---

### :writing_hand: Weblog Posts :
This half will present the current weblog posts revealed by a GitHub shopper at fully completely completely different working a weblog platforms. To understand this, we’ll create a GitHub workflow, which is an automatic course of to execute jobs. Every job in a workflow might need loads of actions. A GitHub motion is a set of executable instructions blended into steps. We're ready to every create our personal GitHub motion or use an motion created by one different shopper.
To fetch the weblog posts, we’ll use two already present actions:
- Checkout: used to take a look at all of the recordsdata all through the present repository to a Git workspace the place our workflow can entry it.
- Weblog Submit Workflow: used to fetch current weblog posts revealed by a shopper on assorted net pages.
The workflow will possible be run on a particular schedule or an occasion set off. For this tutorial, we’ll execute the workflow each one hour, to fetch the current weblog publish. You most likely will be taught extra about GitHub actions from the official documentation.
To configure the GitHub workflow, observe these steps:
- Add the next code to your
README.md. The workflow will alternate the remark beneath with the rules of revealed weblog posts: - Save the modifications by clicking on the Commit modifications button.
- The configuration of GitHub workflow is printed in a
.ymlfile, which follows a YAML syntax. In your repository, all through the Add File dropdown, choose Create New file.
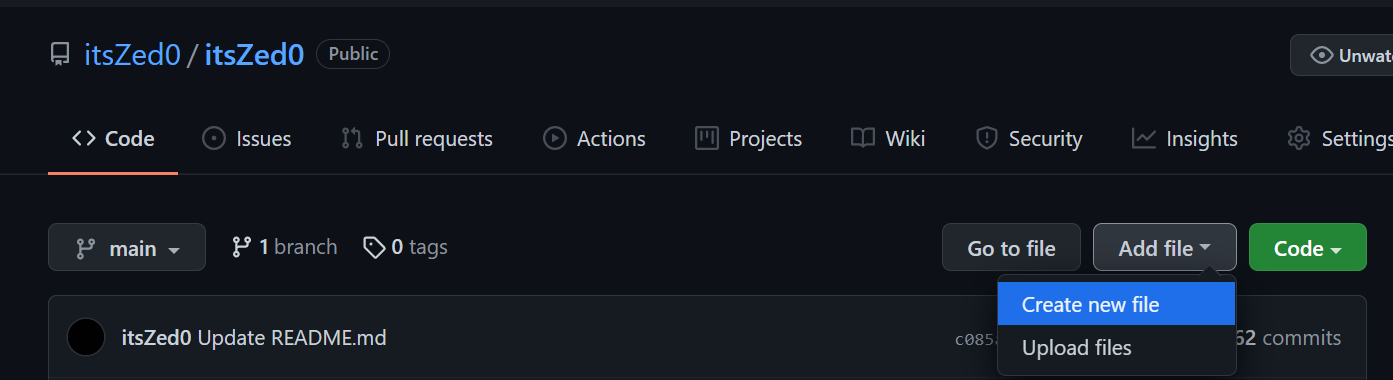
- In Set up your file.. self-discipline, enter
.github/workflows/blog-post-workflow.yml. All GitHub workflow’s.ymlconfiguration recordsdata reside beneath the.github/workflowsitemizing.
- Add the next code all through the Edit new file tab:
title: Newest weblog publish workflow
on:
  schedule:

    - cron: '0 * * * *'
  workflow_dispatch:

jobs:
  update-readme-with-blog:
    title: Substitute this repos README with newest weblog posts
    runs-on: ubuntu-newest
    steps:
      - makes use of: actions/checkout@v2
      - makes use of: gautamkrishnar/weblog-publish-workflow@grasp
        with:
          max_post_count: "4"
          feed_list: "https://dev.to/feed/itszed0"
Contained in the above code, we’ve outlined a workflow with title as “Newest weblog publish workflow”, which runs on a schedule talked about all through the cron self-discipline. 0 * * * * is a POSIX cron syntax, which suggests that the schedule is to run on the 0th minute each hour.
workflow_dispatch: permits the customer to set off the workflow manually. jobs allow us to stipulate loads of jobs that may run when the workflow is executed. In our case, now we have one job — that's, update-readme-with-blog — which runs-on an Ubuntu atmosphere machine hosted by GitHub.
steps outline a set of actions or instructions to be executed. We’ve outlined two actions beneath steps: actions/checkout@v2 and gautamkrishnar/blog-post-workflow@grasp. The latter takes two enter parameters outlined beneath the with self-discipline. max_post_count defines the utmost variety of posts to degree out all through the README, feed_list is a comma-separated RSS feed of URLs for quite a few working a weblog platforms.
On this tutorial, we’ve fetched blogs from the dev.to platform. For the rules of all supported platforms, examine this documentation.
To be taught extra about GitHub workflow syntax, take a look at this Workflow Syntax documentation.
Change the feed_list alongside collectively together with your RSS feed URLs and click on on on on the Commit new file button. This might successfully create the workflow. It can fetch new weblog posts from dev.to and add them to your README.md file each hour.
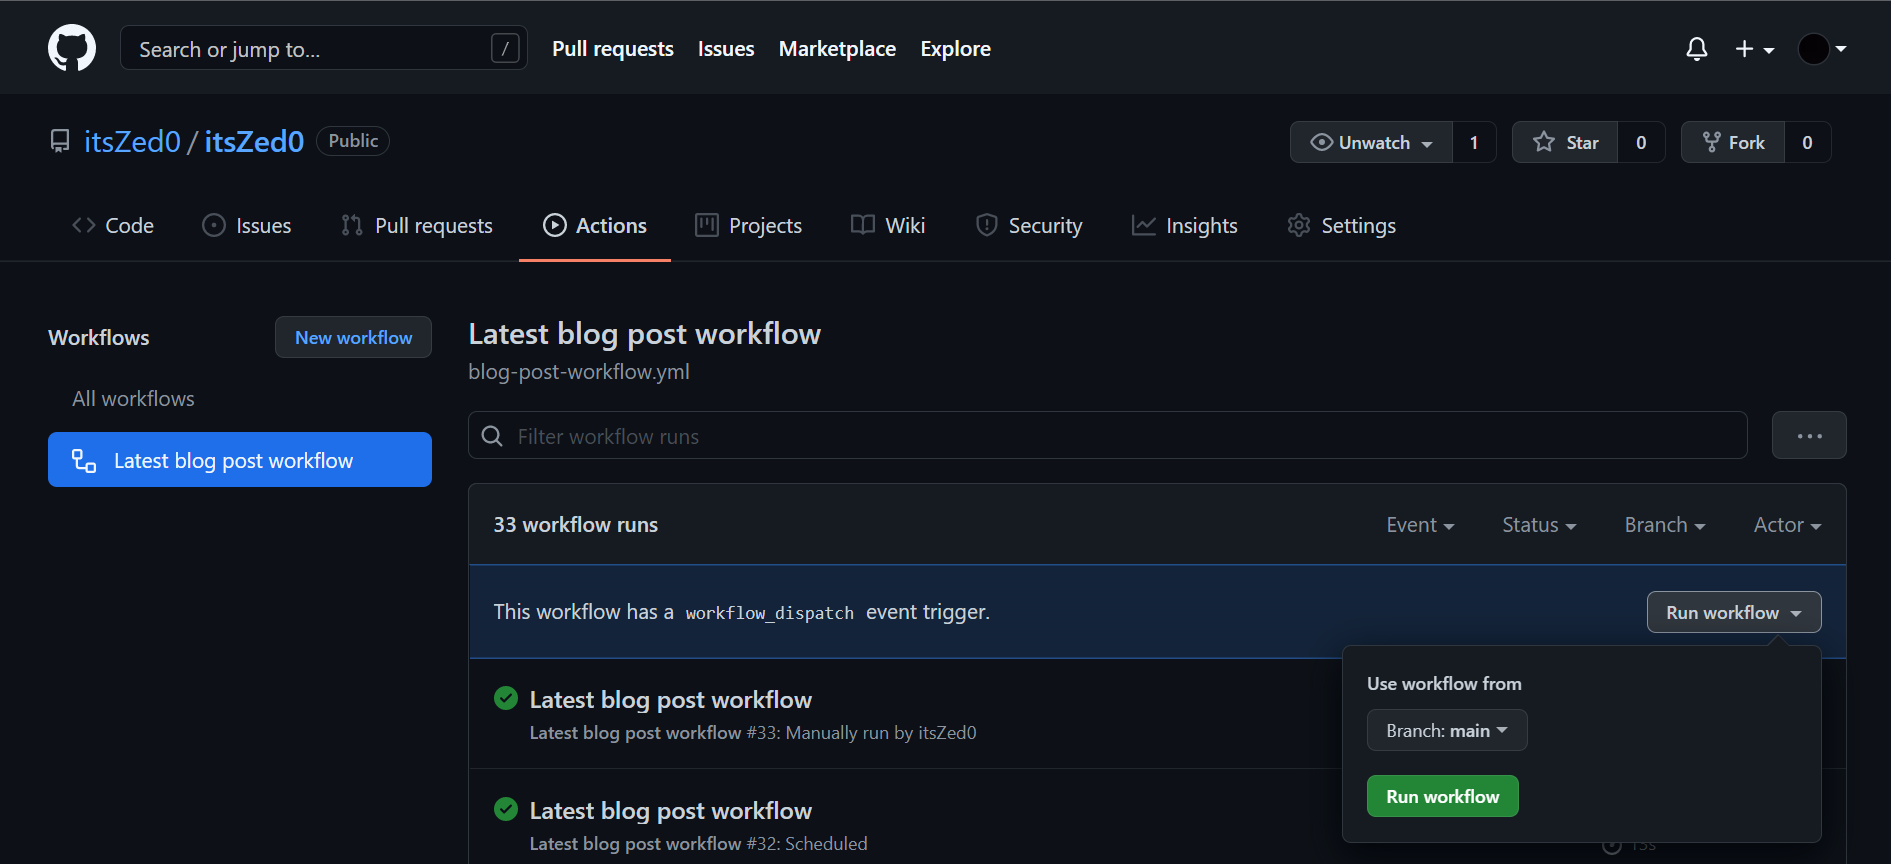
To set off the workflow manually, observe these steps:
- In your repository, go to the Actions tab.
- Beneath All workflows, click on on on on Newest weblog publish workflow.
- Contained in the Run workflow dropdown, click on on on on the Run workflow button. The workflow will begin executing.
- Go to your GitHub profile internet net web page, and beneath the “Weblog Posts” half you’ll see an inventory of all of the weblog posts from the working a weblog platforms outlined all through the
blog-post-workflow.ymlfile. Beneath is the output for"https://dev.to/feed/itszed0"all through thefeed_list.
Observe that the customer itsZed0 has one article titled “Study Submit” at dev.to, which is able to possible be discovered correct proper right here. Because of this truth, the workflow fetches that one article and divulges it all through the GitHub profile README.
The final phrase GitHub profile is pictured beneath.
Conclusion
On this tutorial, we’ve discovered what a GitHub profile README is and the way in which wherein to:
- create a GitHub profile README
- add GIFs, descriptions, expertise
- add GitHub Streak Stats and GitHub Readme Stats
- create a GitHub workflow to fetch the most recent revealed weblog posts
I hope this tutorial conjures up you to create an unbelievable GitHub profile README. Furthermore, you possibly can bear these open-source duties that’ll allow you to add some extra cool decisions to your GitHub profile README:
FAQs About GitHub Readme
What's a GitHub README?
A GitHub README is a main doc in a software program program program enterprise hosted on GitHub, usually named “README.md” utilizing Markdown formatting. Serving because of the doorway internet net web page of a repository, it presents a concise nonetheless informative introduction to the enterprise. The README’s primary intention is to provide an summary of the enterprise’s intention, decisions, and utilization. It usually contains organize directions, utilization examples, and hyperlinks to extra full documentation.
Furthermore, the README may comprise pointers for contributing to the enterprise, specifying how purchasers can report components, counsel modifications, or adhere to coding conventions. It furthermore mentions the enterprise’s license, outlining how others can use and contribute to the code. Seen elements like badges could also be added to point important information identical to assemble standing, code security, or model numbers. In essence, a well-crafted README is instrumental in facilitating enterprise understanding, shopper adoption, and collaboration all by means of the GitHub group.
customise a GitHub profile?
Customizing your GitHub profile is an environment friendly technique to personalize your presence on the platform and spotlight your work and pursuits. To get began, create or change a repository with the an an identical title as your GitHub username. Inside this repository, add a README.md file the place you possibly can present particulars about your self, your duties, and completely completely different particulars you must showcase. It is best to make use of Markdown formatting to pattern your content material materials supplies, together with textual content material materials, photos, hyperlinks, and extra.
After customizing your README.md, commit your modifications to the repository. Then, navigate to your repository’s settings, notably the “GitHub Pages” half. Correct proper right here, set the division containing your README.md because of the availability, and save your settings. Your personalized profile will now current your README.md content material materials supplies, permitting you to share your story and duties with the GitHub group. If desired, you possibly can further personalize your profile by pinning repositories that you just simply should function prominently.
Keep in mind the truth that your GitHub profile is seen to most individuals, so make sure your customization represents you and your work effectively. This customization not solely provides a private contact to your GitHub presence nonetheless furthermore serves as a useful portfolio for potential collaborators and employers.
add GitHub stats to README?
So as in order so as to add GitHub stats to your README, you possibly can revenue from third-party suppliers like GitHub Readme Stats or shields.io. With GitHub Readme Stats, you possibly can merely embed dynamic GitHub statistics immediately into your README. Begin by visiting the GitHub Readme Stats repository, copying the geared up code snippet, and pasting it into your README.md file. Customise the code alongside collectively together with your GitHub username and hottest choices, then commit the modifications. When any particular person views your README on GitHub, it would routinely fetch and current your GitHub statistics, enhancing your profile’s visibility.
One different choice is to make the most of shields.io, a flexible badge generator service. You most likely can entry shields.io and choose the GitHub class to create badges showcasing assorted GitHub statistics, identical to followers, stars, or your newest commit. After configuring your badge, shields.io will generate a URL that you just'd be succesful to embed in your README. Merely insert a picture tag with the generated URL in your README.md, and the badge will seem, providing a fast snapshot of your GitHub prepare.
make an superior GitHub profile README?
To create an impactful GitHub profile README, think about a concise nonetheless participating presentation of your expertise and duties. Start with a quick introduction, collectively collectively together with your title, function, and a contact of personalization to make it relatable. Use educated picture to humanize your profile.
Subsequent, showcase your work by organizing sections with enterprise thumbnails, titles, descriptions, and hyperlinks to your repositories or deployed capabilities. Consider incorporating GitHub Readme Stats or widgets to point your GitHub prepare, lending credibility to your contributions. Itemizing your expertise and utilized sciences to present viewers notion into your experience. Spotlight important achievements and contributions, and supply contact information for networking and collaboration choices.
Customise the seems to be like with Markdown or HTML for formatting and preserve a seamless theme. Preserve your README up to date as you embark on new duties or attain milestones, and encourage engagement from mates by together with a popularity to motion. Don’t hesitate to infuse creativity by means of GIFs, emojis, or distinctive design elements. Lastly, think about and proofread your README for readability and accuracy, aiming to create an eternal and constructive impression for lots of who uncover your GitHub profile.
I'm a full stack developer from India. I'm a hands-on learner, on account of this truth favor discovering out new utilized sciences by means of enchancment. In my free time, I uncover new utilized sciences, be taught tech blogs and resolve factors on Information Buildings and Algorithms.
professioncareer-advancementgit tutorialgithub