
One amongst many finest challenges in establishing an API is authentication. That’s doable most likely essentially the most important assault surfaces an API has. Applicable authentication helps keep away from safety threats and ensures that solely the precise purchasers can entry the required knowledge.
Authentication was as quickly as easy when groups had been working with server-side capabilities. A easy session validation on the server was ample to make sure shopper permissions for operations. Nonetheless, the arrival of APIs has led to an unlimited shift in these authentication challenges.
Nonetheless with an API, you possibly can’t implement durations. You will’t assure that your API will all the time be invoked utilizing an internet primarily based browser, so you possibly can’t depend upon cookies to protected an API. One amongst many essential selections of an API is that it’s stateless, that suggests that each request despatched to an API doesn’t depend upon any earlier or subsequent requests. Ensuing from this reality, you want an method ready to carrying the authentication/authorization info essential to validate a request.
One setting pleasant API authentication method is utilizing JSON Net Tokens (JWTs). On this textual content, we’ll delve into the small print of JWTs and supply a whole knowledge on easy methods to implement a REST API utilizing Node.js, with JWTs on account of the safety measure.
Key Takeaways
- Implementing JWTs for protected communication. The article presents an in-depth knowledge on implementing JWTs for authentication in net capabilities. This consists of token know-how, transmission and verification. By doing so, it enhances the ultimate API safety by stopping damaged entry administration and by letting solely the accepted of us entry the data.
- Place-based entry administration in JWT. This textual content material showcases an summary of role-based entry administration all through which specific API endpoints are restricted for sure roles. As an illustration, an administrator can view all purchasers, whereas a purchaser can’t. This was utilized on this textual content by managing customized claims inside all through the JWT Token.
- Implementation of JWT in a REST API. The article presents a step-by-step method to establishing a easy REST API utilizing Node.js, Categorical, and the jsonwebtoken library for JWT authentication. It consists of constructing the endeavor, inserting in needed libraries, making a serious shopper database, and implementing login and shopper knowledge endpoints. The technique accommodates producing a token upon shopper login and validating this token in subsequent requests to authorize or deny entry primarily based completely on the patron’s place.
What’s a JSON Net Token (JWT)?
A JSON Net Token (JWT) is an open commonplace (RFC 7519) that defines a method of transferring info between two events, a consumer and a server, as a JSON object. It’s essential to notice that the information being transferred between the 2 events is digitally signed utilizing a non-public signature. Ensuing from this reality, that is thought of verified and guarded to make use of knowledge.
Phrase: usually, JWT is used to assemble authentication and authorization flows for an API.
As an illustration, info which may be utilized to affiliate a consumer with a request is normally wrapped in a JWT. This might embody a consumer ID and a job, and your API might use this info to go looking out out if the patron sending the request is allowed to take movement.
When Ought to You Use JWT?
There are usually two fundamental situations all through which you could possibly think about using a JWT Token.
- Authentication/authorization. That’s doable most likely essentially the most usually accepted use instances of JWT. You will assemble an authentication token to validate requests in your API and be sure that accepted purchasers are performing accepted actions.
- Data change. Additionally it is potential to leverage JWTs to change info between events securely. They function a superb sort of official and accepted knowledge as JWTs may be signed. As an illustration, utilizing public/non-public key pairs, you would possibly make sure the senders are who they’re saying they’re. This allows you to make further checks to make sure your info hasn’t been tampered with.
Improvement of a JWT Token
To realize all the effectivity, the JWT token is structured in a sure technique. It has three key parts:
- Header. The header consists of two parts: the token kind, JWT, and the signing algorithm getting used, resembling HMAC SHA256 or RSA.
- Payload. The payload incorporates your claims. Claims are info that describes the entity you’re issuing the token. As an illustration, do you must had been issuing a token for a consumer, you’d have claims equivalent to the patron ID and place. Other than that, a JWT token has a typical set of claims such on account of the issuer, the time of issuing, the expiration time and further.
- Signature. That is one issue that it’s good to create. To create the signature, you could possibly take the encoded header, the encoded payload, a secret, and the algorithm specified all through the header and signal that. That is achieved to make sure the message wasn’t modified alongside the way in which by which throughout which.
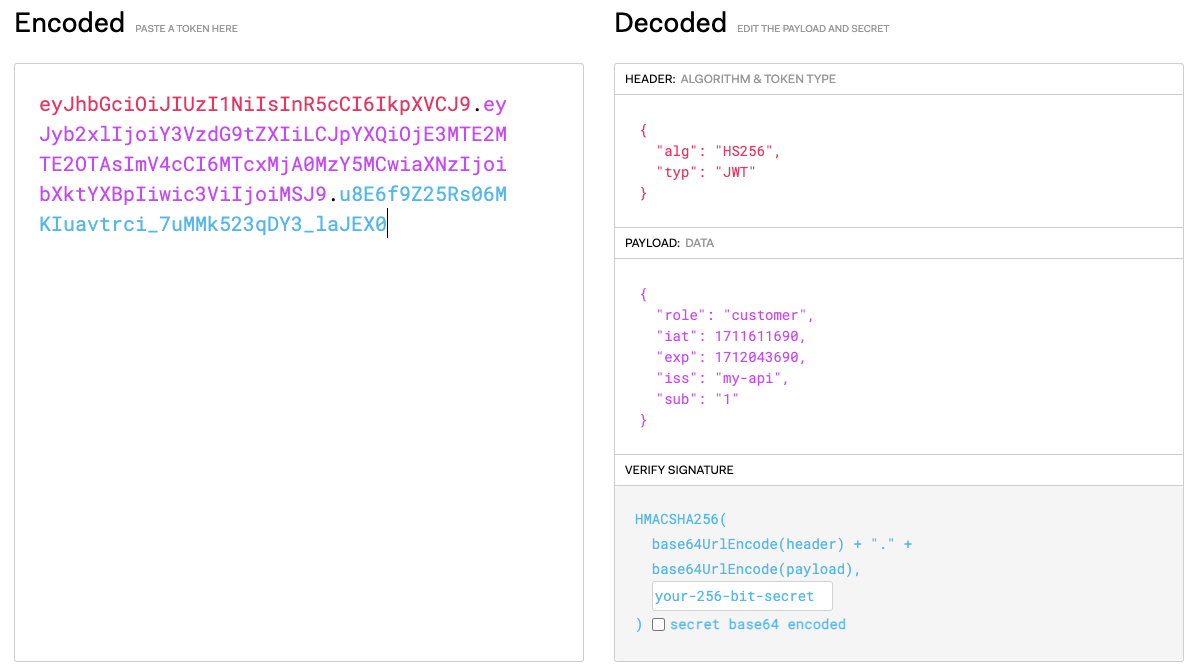
Phrase: your JWT token is a plan base64 string that accommodates of those three parts the place every issue is seperated utilizing a ..
As an illustration, a easy token might look one issue like this:
header.payload.signatureMoreover, your decoded token would really like one issue like pictured beneath.

As you possibly can see, the header, payload and signature are decoded and confirmed above.
Course of Circulation of a JWT
Now, do you have to’re establishing an API with JWT it’s good to contemplate the next:
- logging in
- token know-how
- token validation
This may occasionally often look one issue like what’s pictured beneath.
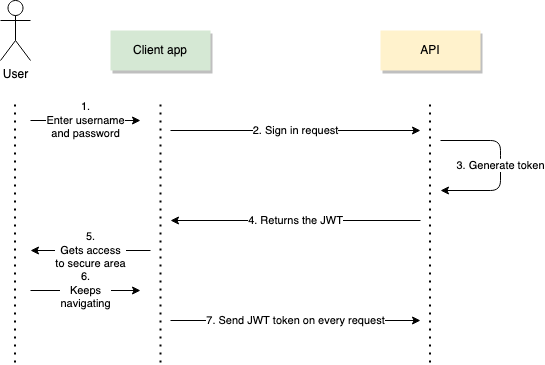
The cycle begins when a consumer first submits a request to log in to the API. They supply a username and a password. Your API verifies whether or not or not or not the credentials are official and, in that case, generates a JWT token for the patron.
Subsequent, your shopper would come with this token all through the Request Header — Authorization — as a Bearer token, in each request they execute. Your API ought to have a look on the request header for all requests and decode and validate the token to authorize the request.
It’s important to regulate to this course of when working with JWT. The API will reject the request in case your header is lacking the JWT Token.
Establishing a REST API with JWT
Establishing an API with JWT authentication is simpler than it appears. There are lot of libraries accessible that deal with the tactic of token know-how and validation by way of easy API strategies.
So, let’s assemble a easy REST API with JWT Authentication.
To take movement, let’s first bootstrap a endeavor utilizing the command:
npm initPhrase: be sure to proceed with the default configurations.
Subsequent, let’s prepare the JWT Library that we’re working with. Let’s use the jsonwebtoken library to create and take care of JWT tokens.
Phrase: I’ve chosen this library as a result of it is incessantly maintained on GitHub and it has over 14 million downloads per week.
So, prepare the library utilizing the command:
npm i jsonwebtokenSubsequent, let’s prepare Categorical to assemble the API. To take movement, run the command:
// categorical - to assemble the api
// cors - to allow cross origin requests
// body-parser - to parse the physique as JSON
npm i categorical cors body-parser
Subsequent, let’s create a database.js file. Since we’re focusing strictly on JWTs correct proper right here, I obtained’t spin up a database, nonetheless significantly shield an in-code database of shoppers. So, open up your database.js file and embody the next code:
const purchasers = [
    { id: '1', name: 'Lakindu', username: 'lak', password: '1234', role: 'customer' },
    { id: '2', name: 'David', username: 'david', password: '1234', role: 'customer' },
    { id: '3', name: 'John', username: 'john', password: '1234', role: 'customer' },
    { id: '4', name: 'Nishanthan', username: 'nishanthan', password: '1234', role: 'customer' },
    { id: '5', name: 'Pasindu', username: 'pasindu', password: '1234', role: 'customer' },
    { id: '6', name: 'Sahan', username: 'sahan', password: '1234', role: 'admin' },
]

module.exports = {
    purchasers
}
As you possibly can see, we’ve outlined an inventory of shoppers which can be going to have entry to our API.
Phrase: do you must had been establishing this on a producing stage, I’d suggest utilizing one issue like Amazon Cognito to take care of your purchasers, or consider hashing to retailer passwords.
Subsequent, create an index.js file to stipulate the API. Open up the index.js file and embody the next code:
app.put up('/login', (req, res) => {
    const { username, password } = req.physique;
    const shopper = purchasers.uncover((shopper) => shopper.username === username);

    if (!shopper || shopper.password !== password) {
        res.standing(400);
        res.ship({ message: 'Invalid username or password' })
        return;
    }

    if (shopper.password === password) {
        const token = jwt.signal({
            place: shopper.place,
        }, tokenSecret, {
            algorithm: 'HS256',
            expiresIn: '5m',
            issuer: 'my-api',
            matter: shopper.id
        })
        res.ship({ token });
        return;
    }
});
We’ve now utilized three API endpoints:
- POST /login. This route makes an try to authenticate a consumer. It expects a username and password to be all through the request physique. The handler searches for a consumer with the matching username all through the purchasers array. If no shopper is discovered or the password doesn’t match, it responds with a 400 standing code and an error message. If a consumer is discovered, it responds with a message indicating worthwhile login.
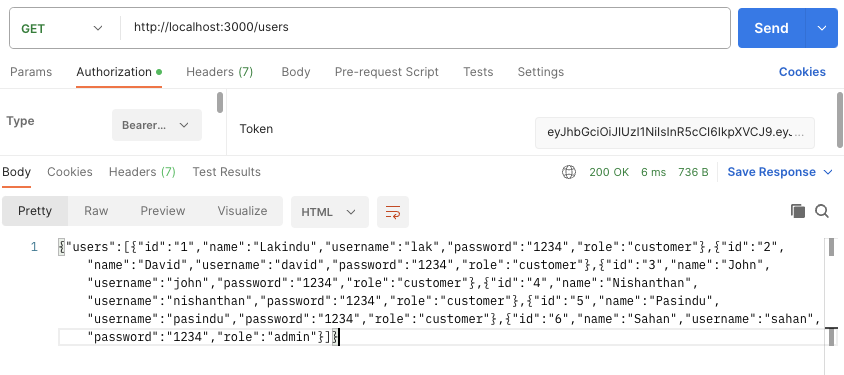
- GET /purchasers. This route responds with a JSON string containing all purchasers.
- GET /purchasers/:userId. This retrieves a
userIdfrom the trail parameters and makes use of it to discover a shopper all through the purchasers array.
Now, in our case, we’re going to leverage JWT for quite a lot of instances:
- When logging in, generate a JWT token and return it to the patron.
- When making requests for the patrons API, they might embody the token for authorization. As an illustration, solely an admin ought to be succesful to fetch a consumer by ID, and get all purchasers. Purchasers shouldn’t be in a position to do that.
So, let’s substitute the login endpoint to generate a token:
const jwt = require('jsonwebtoken');

app.put up('/login', (req, res) => {
    const { username, password } = req.physique;
    const shopper = purchasers.uncover((shopper) => shopper.username === username);

    if (!shopper || shopper.password !== password) {
        res.standing(400);
        res.ship({ message: 'Invalid username or password' })
        return;
    }

    if (shopper.password === password) {
        const token = jwt.signal({
            place: shopper.place,
        }, tokenSecret, {
            algorithm: 'HS256',
            expiresIn: '5m',
            issuer: 'my-api',
            matter: shopper.id
        })
        res.ship({ token });
        return;
    }
});
As you possibly can see, we’ve up to date the login endpoint to leverage the jsonwebtoken library to create a signed token. The token makes use of the HMAC SHA-256 algorithm, and should expire in 5 minutes and is issued to the topic with the userId. Which suggests the token is supposed for use for a selected shopper.
Moreover, we’ve furthermore handed a tokenSecret. That is normally a secret key that’s used to decode the token for all future requests. This furthermore provides a layer of safety to your token, all through which all tokens that may’t be decoded by your secret key may be deemed as tampered.
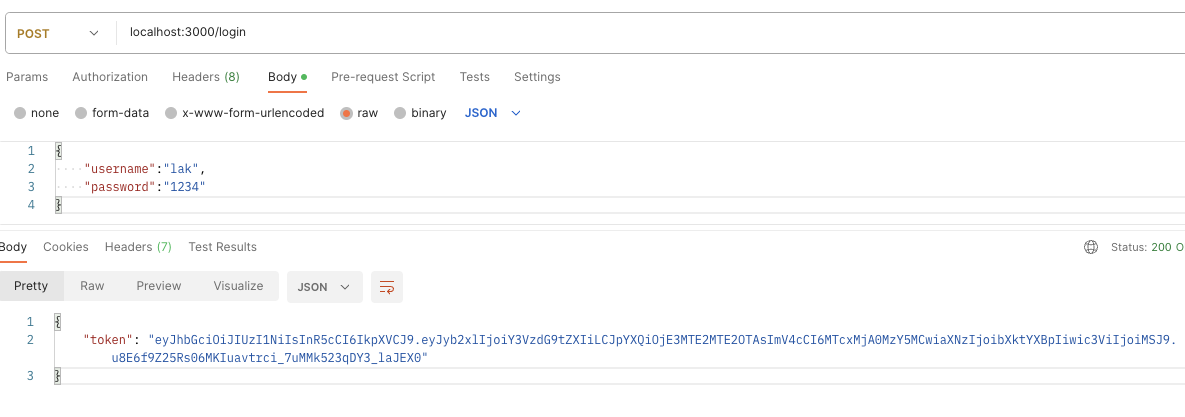
So, do you have to execute your login endpoint, you could possibly get a token as your output, as pictured beneath.
Throughout the event you paste the token on jwt.io‘s on-line debugger, you possibly can see the properties pictured beneath.
Now, let’s substitute the Particular person API to validate the token. To take movement, let’s create a role-based entry administration (RBAC) operate:
const validateRequest = (requiredRole) => {
    return (req, res, subsequent) => {
        const { authorization } = req.headers
        const token = authorization.substring('Bearer '.measurement);
        strive {
            const { exp, iss, place } = jwt.affirm(token, tokenSecret);

            if (iss === 'my-api' && exp  Date.now() && place === requiredRole) {
                subsequent();
                return;
            }
        } catch (err) {
            res.sendStatus(403);
            return;
        }
    }
}
Over correct proper right here, we’ve created a higher-order operate that takes a requiredRole parameter and returns a middleware operate. This design permits us to create middleware tailor-made to the place required for accessing specific routes. Consequently, the returned operate is middleware acceptable with Categorical. It takes the identical previous req (request), res (response), and subsequent (operate to name the subsequent middleware) parameters.
This returned operate validates the JWT token by doing the next:
- Extracting the token. It begins by extracting the JWT from the Authorization header of the incoming request. The anticipated format of the header is Bearer [token], so it removes the
'Bearer 'prefix to isolate the token. - Decoding the token. The token is then decoded utilizing
jwt.decode(token), which parses the JWT and extracts its payload with out verifying the signature. The payload is anticipated to comprise in any case three claims:exp(expiration time),iss(issuer), andplace(shopper place). - Validation checks. The middleware performs the next checks on the decoded token:
- Issuer. Verifies that the
iss(issuer) declare matches'my-api', indicating that the token was issued by the anticipated authority. - Expiration. Checks if
exp(expiration time) is lower than the present time (Date.now()), which might point out the token is expired. - Place. Compares the place declare all through the token to the
requiredRoleparameter handed tovalidateRequest. This ensures the patron has the appropriate place for the request.
- Issuer. Verifies that the
Phrase: if all checks go (issuer is suitable, token has not expired, and shopper has the required place), it calls subsequent() to proceed to the subsequent middleware or route handler. If any check out fails, it sends a 403 Forbidden standing code on account of the response, indicating that the request is unauthorized.
Subsequent, you possibly can add the middleware operate to your routes and specify the place required to entry the route:
app.get('/purchasers', validateRequest('admin'), (req, res) => {
res.ship(JSON.stringify({ purchasers }))
});
app.get('/purchasers/:userId', validateRequest('admin'), (req, res) => {
const { params } = req;
const { userId } = params;
console.log({ userId });
const shopper = purchasers.uncover((shopper) => shopper.id === userId);
if (!shopper) {
res.sendStatus(404)
return;
}
res.ship({ shopper })
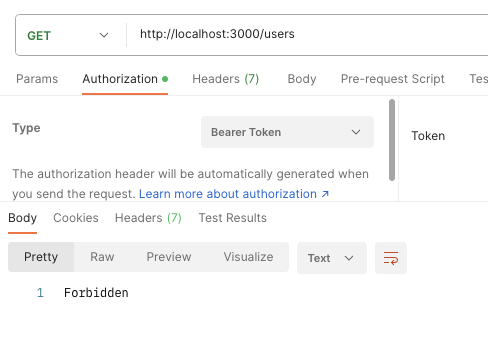
});As confirmed above, each routes are protected in order that solely the administrator can entry it. Now, do you must try and entry the route as a purchaser or with an invalid token, you could possibly see the output pictured beneath.
Nonetheless, in case your token is official, you could possibly see the output pictured beneath.
Wrapping Up
And that’s practically it for this textual content material. You’ve got obtained gotten successfully constructed a REST API utilizing JWT primarily based completely authentication/authorization.
Subsequent, you possibly can profit from this token in your client-side apps like Angular or React and go the token in all API requests to make sure that your frontend is ready to talk about with the API successfully.
Throughout the event you could strive the code, be at liberty to go to my GitHub repo, or this CodeSandbox demo.
Thanks for studying.
Steadily Requested Questions (FAQs) about Utilizing JSON Net Tokens in Node.js
A JSON Net Token (JWT) is a compact, URL-safe technique of representing claims to be transferred between two events. JWTs are used to securely transmit info between a consumer and a server as a JSON object, which could be verified and trusted on account of it’s digitally signed.
How do I deal with JWT expiration?
JWTs have an expiration subject (exp) that determines when the token isn’t official. To deal with expiration in Node.js, you could use a method provided by the token know-how library that you have used.
Ought to I retailer JWTs in cookies or native storage?
The selection between storing JWTs in cookies or native storage is about by the precise wants and safety issues of your utility.
Cookies are sometimes safer when precisely configured (e.g., HttpOnly, Protected, SameSite), as they’re much a lot much less liable to XSS assaults than native storage. Nonetheless, cookies may be inclined to CSRF assaults. Utilizing native storage makes your token liable to XSS assaults nonetheless not CSRF assaults.
Ensuing from this reality, it’s important to weigh these factors and apply further safety measures accordingly, whatever the method you undertake.
Sure, JWTs may be refreshed by issuing a mannequin new token to the patron before the sooner token expires. This usually accommodates having a separate refresh token that’s used solely to amass new entry tokens.
The refresh token is saved securely on the server and is shipped to the patron alongside the entry token. When the entry token is about to run out, the patron can request a mannequin new one utilizing the refresh token.
How do I ship a JSON Net Token to the patron?
After producing a token, you possibly can ship it to the patron all through the response to a worthwhile login request. The patron ought to then retailer the token and embody it all through the Authorization header of subsequent requests.
How do I defend routes with JSON Net Tokens in Node.js?
To guard routes, you possibly can create a middleware operate that verifies the token included all through the request’s Authorization header. If the token is official, the middleware operate must name subsequent to permit the request to proceed. If the token is invalid, the middleware operate ought to ship a response with an error standing code.
How do I deal with errors when verifying a token?
When verifying a token, the affirm technique calls the callback operate with an error if the token is invalid. You will deal with this error to ship a response with an related standing code and message. As an illustration, if the error is on account of the token has expired, it’s possible you’ll ship a 401 Unauthorized standing code with a message saying “Session expired. Please log in as quickly as further.”